Mexican Concha (Shell) Recipe
September 13, 2013
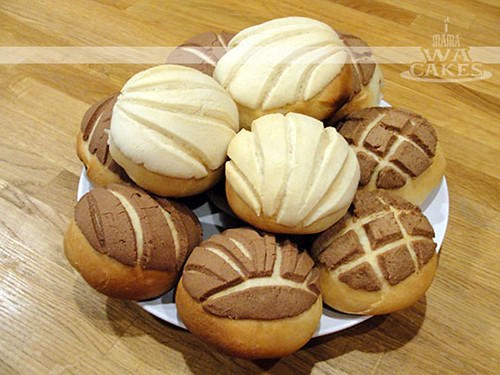
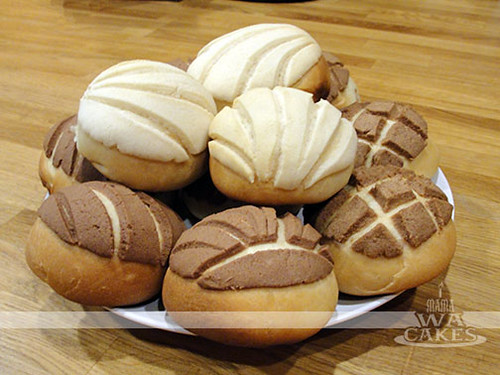
Whenever I walk into a panaderia, the warm inviting smell of cinnamon and sugar always lead me to these buns. They are warm and soft, pillowy and comforting. Yes, comforting. When the sugary topping dissolves on the taste buds, and instantly a smile comes across my face. And with that smile, I decided to try my hand at these delicious shells. Baking bread is definitely different from baking cakes... you have to let it grow ( or rise in this case ) and knead it with love. I was so proud of my first batch of Conchas that I decided to share this with you. Please let me know what you think. Enjoy!
Ingredients
- 3 teaspoons active dry yeast
- 1/2 cup warm water ( 105 degrees F to 115 degrees F or 40 to 46 celsius)
- 1/2 cup lukewarm milk ( scalded, then cooled)
- 1/3 cup granulated sugar
- 1/3 cup butter, softened
- 1 teaspoon salt
- 1 egg
- 3 1/2-4 cups all-purpose flour
- 1/3 cup granulated sugar
- 1/4 cup butter or 1/4 cup margarine
- 1/2 cup all-purpose flour
- 1 teaspoon ground cinnamon
- 1/4 teaspoon vanilla extract
- 1 1/2 teaspoons orange zest
Flavored Topping Dough
Directions
1. Dissolve yeast in warm water in large bowl.
2. Stir in milk, sugar, butter, salt, egg and 2 cups of the flour.
3. Mix until smooth.
4. Stir in enough remaining flour to make dough easy to handle.
5. Turn onto a lightly floured surface.
6. Knead until smooth and elastic, about 5 minutes.
7. Place in a large greased bowl, then turn greased side up.
8. Cover and let rise in a warm place until double, about 1 1/2 hours. (Tip: The longer you let it rise, the soft the bread.) While this is rising, prepare Flavored Topping Dough.
9. The dough is ready if it leaves an indentation when touched.
10. Punch dough down; divide into 12 equal pieces. Shape each piece into a ball; place on greased cookie sheet.
11. Divide the three flavored dough into 4 equal pieces.
12. Pat each piece into a 3-inch circle. Place 1 circle of Topping Dough on each ball of bread dough, shaping it down over the ball.
13. Make 5 or 6 cuts across the topping, using a table knife, to form a shell pattern.
14. Cover and let rise until double — about 40 minutes.
Heat oven to 375 degrees F (190 celsius). Bake buns until golden brown, about 20 minutes.
Flavored Topping Dough
1. Beat sugar and margarine until light and fluffy.
2. Stir in flour until mixture is the consistency of thick paste.
3. Divide into 3 equal parts.
4. Stir cinnamon into one part, vanilla extract into one part and orange peel into one part.
2. Stir in flour until mixture is the consistency of thick paste.
3. Divide into 3 equal parts.
4. Stir cinnamon into one part, vanilla extract into one part and orange peel into one part.
Pierson's Mickey Mouse Cake
July 19, 2013
A year ago, I made Pierson a Yo Gabba Gabba cake for his first birthday, and everyone loved it :) This year, when my friend asked if I could make him another cake, I was happy to say yes! But this time, it would be themed after everyone's favorite mouse...Mickey!
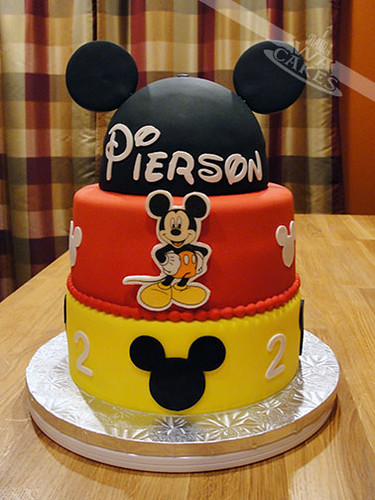
I wanted the cake to represent Mickey Mouse without looking exactly like him. The colors were ordered to copy the colors on the cheerful guy - Yellow (shoes), Red (shorts), and Black (ears). Get it? You got it!
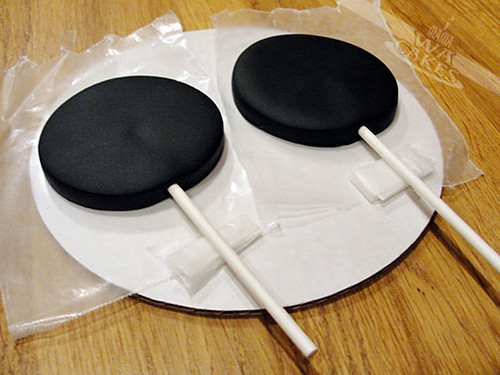
A few days prior to baking, I formed the recognizable mouse ears. I rolled out a thick sheet of black fondant mixed with tylose powder. That helps harden the fondant like gumpaste. I then proceeded to cut out the two ears with the help of a 3 inch diameter round cutter. 6 inch popsicle sticks were then gently inserted with a touch of gum glue. These were left to dry completely so that they would be nice and firm to handle. Another element that I made ahead of time was the edible plaque of Mickey Mouse. I found an image online and sized it to what I needed, and created a halo around him. I did this because I like the contrast of the white against the cake's color. I brushed on a thin layer of clear piping gel onto a thin sheet of gumpaste, and adhered the edible image to it. I allowed it to set a few minutes before I cut it out with an small pen knife.
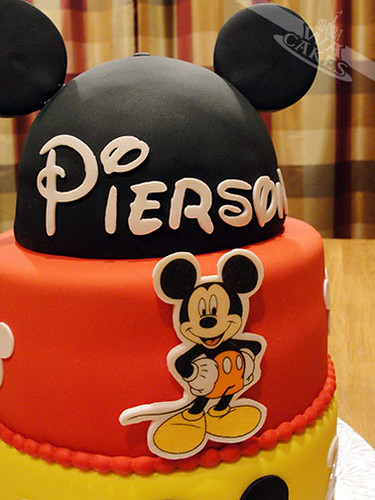 The cake itself was as yummy as it looks! I started with two 9 inch layers, and two 8 inch layers of rich chocolate cake. These were then filled with a toasty, gooey coconut filling. I love these two flavors together, Yum! The Mickey hat was also the same flavor, but was baked in half of a Wilton Sports Ball Pan. All the layers were then covered in fondant and stacked, making sure that they level and straight. Fondant decorations were then cut out to embellish the sides of the bottom two cakes. Pierson's name was cut out in the same style as the Disney's logo, of course. It's starting to look like a hat I once owned when I was young. For final touches, I attached the edible plaque to the cake with some melted candy coating, and carefully inserted the ears into the hat part, making sure they were even. The finished cake almost had me singing, "M-I-C-K-E-Y, M-O-U-S-E!"
I wanted the cake to represent Mickey Mouse without looking exactly like him. The colors were ordered to copy the colors on the cheerful guy - Yellow (shoes), Red (shorts), and Black (ears). Get it? You got it!
A few days prior to baking, I formed the recognizable mouse ears. I rolled out a thick sheet of black fondant mixed with tylose powder. That helps harden the fondant like gumpaste. I then proceeded to cut out the two ears with the help of a 3 inch diameter round cutter. 6 inch popsicle sticks were then gently inserted with a touch of gum glue. These were left to dry completely so that they would be nice and firm to handle. Another element that I made ahead of time was the edible plaque of Mickey Mouse. I found an image online and sized it to what I needed, and created a halo around him. I did this because I like the contrast of the white against the cake's color. I brushed on a thin layer of clear piping gel onto a thin sheet of gumpaste, and adhered the edible image to it. I allowed it to set a few minutes before I cut it out with an small pen knife.
 The cake itself was as yummy as it looks! I started with two 9 inch layers, and two 8 inch layers of rich chocolate cake. These were then filled with a toasty, gooey coconut filling. I love these two flavors together, Yum! The Mickey hat was also the same flavor, but was baked in half of a Wilton Sports Ball Pan. All the layers were then covered in fondant and stacked, making sure that they level and straight. Fondant decorations were then cut out to embellish the sides of the bottom two cakes. Pierson's name was cut out in the same style as the Disney's logo, of course. It's starting to look like a hat I once owned when I was young. For final touches, I attached the edible plaque to the cake with some melted candy coating, and carefully inserted the ears into the hat part, making sure they were even. The finished cake almost had me singing, "M-I-C-K-E-Y, M-O-U-S-E!"
Stephanie's Chevron Bridal Shower Cake
July 17, 2013
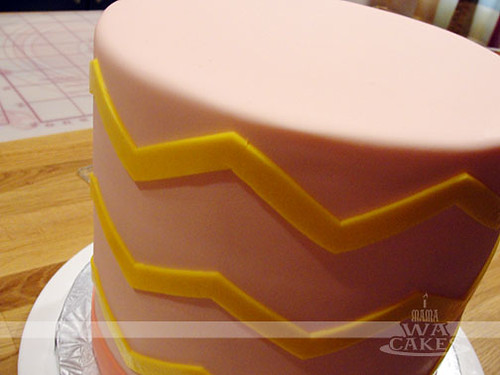
I was totally excited about making this cake earlier this month. I not only got to design a cake based the latest chevron trend. but I also got to try a new method I learned on Craftsy.com. It's the wax paper method taught by Jessica Harris. I wish I knew about this method years ago when decorating some other cakes. It would've made things so much easier, and would've kept me sane!
 This tall cake is made of alternating layers of chocolate and strawberry cake filled with strawberry preserve. I wish I had a photo of the served cake just so you could what the layers looked like. Whenever a cake is so tall, I like to separate the cake in half with a hidden cake board that is trimmed slightly smaller than the diameter of the cake. Boba straws were inserted into the bottom half to support the weight of the top half. I find that Boba straws are easier to use and cut than wooden cake dowels. This trick makes the cake stable and easier to serve, because cutting an 8" tall slice of cake can be a bit tricky and messy. I made an illustration of the cake construction so you can see what I did. I hope that helps!
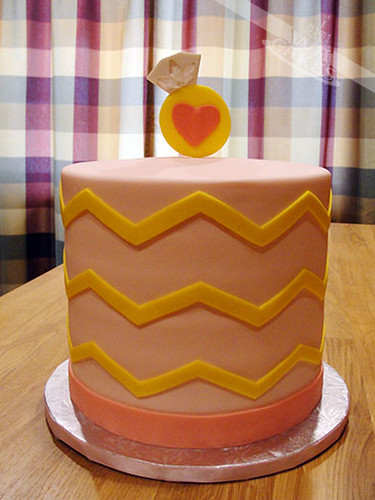
All the layers were then crumb coated in buttercream, with some piped into space around the middle to hide the cake board. The cake was then covered in a blanket of soft pale pink, and the bottom edge was finished with a darker pink ribbon of fondant. Now, here comes the fun part...Chevrons!!! For the chevrons, I measured the circumference of my cake after I covered it with fondant. I then used that number and created my chevron template to cut out them out with, but this is where the wax paper method comes into play. Instead of just cutting out long strips of the chevron and painstakingly trying to align them on the cake, I cut them out on a long sheet of wax paper that is the height and length of my cake. The cut fondant sticks to the wax paper in the same positions as if they were on my cake. I then transfer the chevrons onto my cake by aligning the wax paper with my cake and wrapping it around and meeting up at only one seam. Tada!
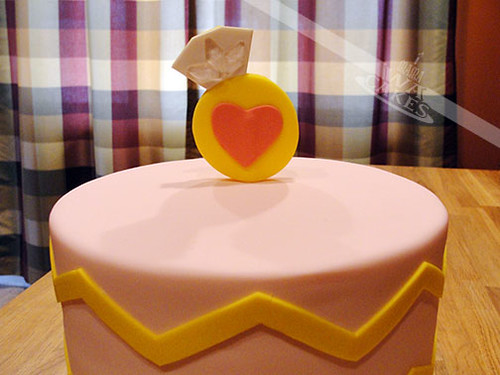 Not that the cake wasn't pretty with just the chevrons, but I just had to make a ring topper that had some sugar diamonds on it. No wedding ring is complete without any type of bling on it :) I made this by hand cutting out two layers of the ring shape, and sandwiching a popsicle stick in between. I then cut out a heart for front and a white layer for the diamond. With some sugar glue, I attached the three sugar diamonds to the white diamond area. This was definitely a fun and pretty cake for such a special event. Congrats Stephanie!
 This tall cake is made of alternating layers of chocolate and strawberry cake filled with strawberry preserve. I wish I had a photo of the served cake just so you could what the layers looked like. Whenever a cake is so tall, I like to separate the cake in half with a hidden cake board that is trimmed slightly smaller than the diameter of the cake. Boba straws were inserted into the bottom half to support the weight of the top half. I find that Boba straws are easier to use and cut than wooden cake dowels. This trick makes the cake stable and easier to serve, because cutting an 8" tall slice of cake can be a bit tricky and messy. I made an illustration of the cake construction so you can see what I did. I hope that helps!
All the layers were then crumb coated in buttercream, with some piped into space around the middle to hide the cake board. The cake was then covered in a blanket of soft pale pink, and the bottom edge was finished with a darker pink ribbon of fondant. Now, here comes the fun part...Chevrons!!! For the chevrons, I measured the circumference of my cake after I covered it with fondant. I then used that number and created my chevron template to cut out them out with, but this is where the wax paper method comes into play. Instead of just cutting out long strips of the chevron and painstakingly trying to align them on the cake, I cut them out on a long sheet of wax paper that is the height and length of my cake. The cut fondant sticks to the wax paper in the same positions as if they were on my cake. I then transfer the chevrons onto my cake by aligning the wax paper with my cake and wrapping it around and meeting up at only one seam. Tada!
 Not that the cake wasn't pretty with just the chevrons, but I just had to make a ring topper that had some sugar diamonds on it. No wedding ring is complete without any type of bling on it :) I made this by hand cutting out two layers of the ring shape, and sandwiching a popsicle stick in between. I then cut out a heart for front and a white layer for the diamond. With some sugar glue, I attached the three sugar diamonds to the white diamond area. This was definitely a fun and pretty cake for such a special event. Congrats Stephanie!
Madelyn's Baby Safari Animal Cake
July 16, 2013 Elk Grove, CA, USA
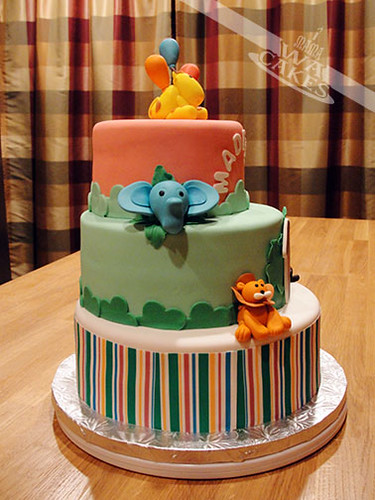
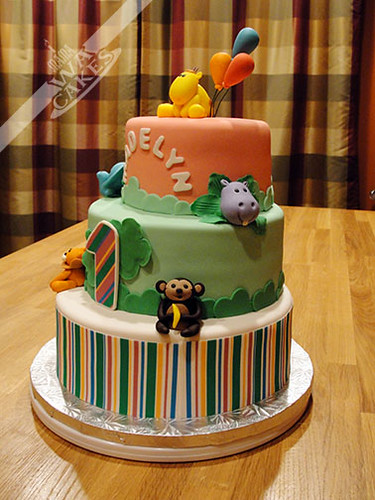
A few weeks ago, I made this cute cake for a girl named Madelyn to celebrate her first birthday. I love making animal themed cakes for young children. All because I get to make the most adorable sugar modeling! Have you seen the giraffe?! I wanna hug that little guy! I used the invitation as my inspiration for this cake, from the colors of the animals, to the stripes I printed on edible frosting sheets.
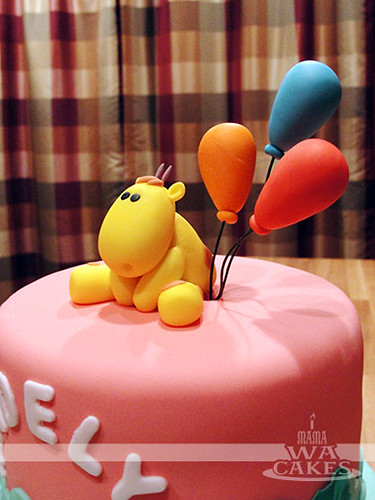
A few days prior to baking, I pulled out all my tools and began shaping the cute baby animals. I mixed the colors I need with gumpaste and gel colors, except for black. For black, I used black fondant and added tylose powder. I feel like it takes a lot of gel color to achieve a rich black when starting with white gumpaste. Each baby animal was then shaped starting with the torso, head, and then the limps. Make sure to give each part a few minutes to harden before adding another part, or the shapes will slouch. I then finish each one with facial features and hair. I used cake decorating floral stamens as antlers for the giraffe, genius! With a printed frosting sheet, I also created an edible plaque for the number 1 by adhering the sheet to rolled out gumpaste. Oh! I almost forgot the balloons! I made tear drops for the balloon bodies and a small disc for the balloon openings out of rolled gumpaste. These were then inserted with wrapped floral wire that I bent a bit for movement. All the animals, balloons, and edible plaque were allowed to dry completely before placing on the cake. Now, time to bake!
The cake began as a 10" tier of vanilla cake filled and covered in buttercream. This was then covered in buttercream flavored fondant, and finished with long strips of the striped frosting sheet. I usually attach frosting sheets or wafer paper to small areas with clear piping gel and a brush. But with a big surface like the sides of a cake, I find it easier and faster to just dampen a clean paper towel. Fold it to fit the height of your cake, hold it along the side, and then give the turntable a spin!
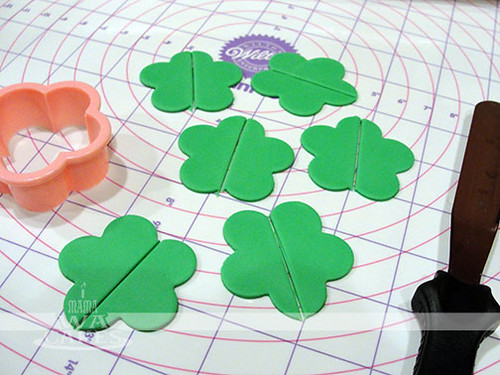 The second tier is a 8" round chocolate cake filled and covered in buttercream. This was then covered in a light green fondant. I then lined the bottom border with what I called cartoon bushes, just like the ones we drew when we were kids. I used a five petal rose cutter and cut out some darker green fondant. I then cut them in half with a spatula to create "bush". I then attached these to the cake with a little water, slightly overlapping one over another. I also flipped the pieces randomly to create some variance.
  The top tier was also a rich chocolate cake filled with buttercream. This was then covered in a light pink blanket of fondant. Using the same rose petal cutter method, I cut out a light green that matched the cake below it. This helped tie the top layer into the rest of the cake. Madelyn's name was then cut of out white fondant, and carefully attached to the cake with a touch of water.
Once all the tiers were completed, I attached the animals and plaque to the cake with piping gel, and added some leaves around the elephant and hippo. I loved the giraffe so much that I had to place it as the topper. The balloons were then grouped together and inserted into the cake next to the little guy. This cake is ready for a celebration!
Subscribe to:
Posts (Atom)







Social Icons