Mark V Helmet Wedding Cake
February 5, 2014
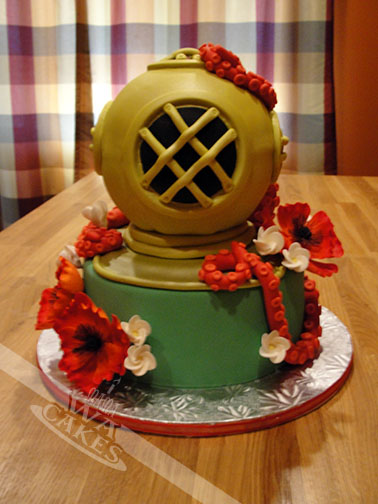
I hope everyone had a wonderful holiday, and a great start to a new year! My past year has been very busy, and time just really flew by. It's been almost 5 months since my last post! As I was going back through my photos, I realized that there was one cake that I never posted about and was definitely worth sharing. I learned so much from designing it, and it forced me to tackle the one thing I dread... covering a sphere with fondant. The idea scares me, and on top that, this cake had to look like an awesome Mark V diving helmet. Chelsey wanted her wedding cake to be a surprise for her husband-to-be who is a professional deep sea diver.
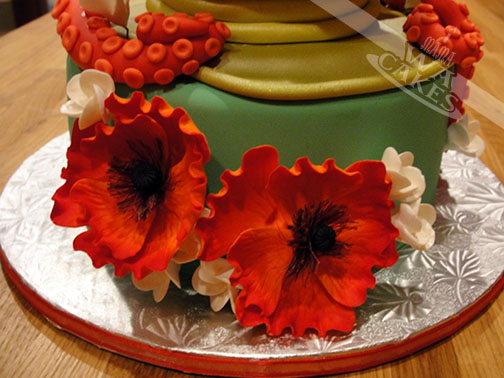
To start off with this design, I created some beautiful red poppies and ivory frangipani out of gumpaste a week prior. I let them dry completely before assembly, and always make extra since accidents can happen. A great tutorial on making gumpaste poppies can be found here. This is was very helpful for me, but of course I used a slightly different cutter. Once they were dry, I used luster dust to add some natural color gradations. The great thing about making gumpaste flowers is that they can be made weeks ahead of time and stored until you're ready to use them.
Next, it was time to dive into the cake, no pun intended :) I knew the dimensions of the cake so I baked two 8" rounds of red velvet, and the same flavor in a 6" Wilton Sports Ball pan. It comes in two hemispheres that are filled, baked, and then stacked to make a 6" ball. The baking seemed easy enough, but the assembly of the different layers had me thinking. My first attempt at the helmet layers resulted in a very squashed bottom half. The weight of the buttercream and fondant would need some extra support. That was when I ditched the bottom cake half and opted for a 6" styrofoam hemisphere. This was perfect! Rule of thumb when dealing with styrofoam... don't let it touch the cake! I gave it a small flat bottom with a knife so it wouldn't roll, and covered it in plastic wrap. A 6" cake board was then placed on top, held in place with a dollop of buttercream. I then placed the top half of the cake ball on it. The sphere was crumb coated and ready for fondant...DUM DUM DUM DUM! You could only imagine that I'm very nervous by now. I gathered myself...took some deep breathes, and proceeded as I knew how. Some people would cover one half, and flip it over to do the other. I wanted no seams so I covered it all in one shot. I set the cake ball on a plastic tub that was smaller in diameter to give me a nice pedestal to work with. This allows me to get the fondant as close to the bottom without having a table top being in the way. I rolled out a light yellow fondant and laid it over my cake ball. Working my way from top to bottom, I rubbing it down inch by inch, lifting any pleats to get it smooth. I continued until I got all the way to the bottom and trimmed away any excess. Phew! The hardest part was over.
 The next step was to prep the bottom layers for the covered ball. I stacked the (2) 8 inch rounds, filled with cream cheese frosting, and crumb coated them in buttercream. This layer then received a smooth blanket of kelly green fondant. Support for the helmet layer was very crucial at this point. I trimmed down a 6" cake board to fit below the flat bottom of the styrofoam part, about 2 inch diameter. I located the center of the cake, and inserted 4 wooden dowels within the size of the mini cake board, and on top of that, I piped a couple dots buttercream. This will hold the cake board in place once it's on the wooden dowels and on the cake below. To create a more finished and cohesive look, I rolled out a rectangular piece of yellow fondant and laid it over the mini cake board and cake to create the collar of the helmet. I gently rubbed down on the fondant along the edge of the cake board so I could locate it. I wanted to make sure that the cake stayed centered. The helmet layer was gently lifted and positioned over the cake board and secure in place with a dollop of royal icing. You can also insert a long dowel through the whole cake to really hold it in place at this point. I know it's a lot to take in, but I hope my illustration to the left would help :)
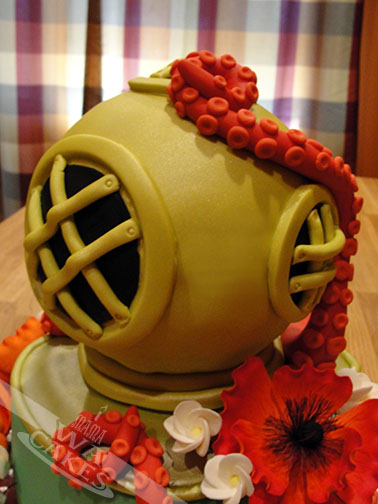
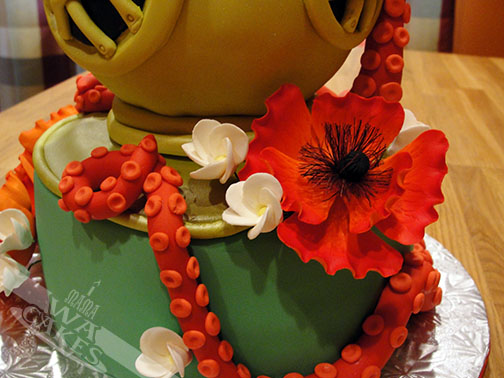
 Once the cake was fully assembled, it was time to finish decorating! I rolled out ropes of fondant and created the signature windows of the Mark V, and trimmed off the edges of the collar. I then airbrushed the yellow parts of helmet with a gold shimmer for a metallic look. Another key element to the cake were the octopus tentacles that look like they are ready to envelop the Mark V. To create these, I rolled out long tapered ropes of red fondant and adhered them to the cake. I started at the base of the collar on the back side, and wrapped the tentacles around the helmet as realistic as I could. I then made small balls of light red fondant that I flattened with a ball tool for the suckers. I used a small detail brush and water to attach them to the tentacles. This made them so life-like! For the final touch, I inserted the gumpaste flowers to soften it up for the bride.
To start off with this design, I created some beautiful red poppies and ivory frangipani out of gumpaste a week prior. I let them dry completely before assembly, and always make extra since accidents can happen. A great tutorial on making gumpaste poppies can be found here. This is was very helpful for me, but of course I used a slightly different cutter. Once they were dry, I used luster dust to add some natural color gradations. The great thing about making gumpaste flowers is that they can be made weeks ahead of time and stored until you're ready to use them.
Next, it was time to dive into the cake, no pun intended :) I knew the dimensions of the cake so I baked two 8" rounds of red velvet, and the same flavor in a 6" Wilton Sports Ball pan. It comes in two hemispheres that are filled, baked, and then stacked to make a 6" ball. The baking seemed easy enough, but the assembly of the different layers had me thinking. My first attempt at the helmet layers resulted in a very squashed bottom half. The weight of the buttercream and fondant would need some extra support. That was when I ditched the bottom cake half and opted for a 6" styrofoam hemisphere. This was perfect! Rule of thumb when dealing with styrofoam... don't let it touch the cake! I gave it a small flat bottom with a knife so it wouldn't roll, and covered it in plastic wrap. A 6" cake board was then placed on top, held in place with a dollop of buttercream. I then placed the top half of the cake ball on it. The sphere was crumb coated and ready for fondant...DUM DUM DUM DUM! You could only imagine that I'm very nervous by now. I gathered myself...took some deep breathes, and proceeded as I knew how. Some people would cover one half, and flip it over to do the other. I wanted no seams so I covered it all in one shot. I set the cake ball on a plastic tub that was smaller in diameter to give me a nice pedestal to work with. This allows me to get the fondant as close to the bottom without having a table top being in the way. I rolled out a light yellow fondant and laid it over my cake ball. Working my way from top to bottom, I rubbing it down inch by inch, lifting any pleats to get it smooth. I continued until I got all the way to the bottom and trimmed away any excess. Phew! The hardest part was over.
 The next step was to prep the bottom layers for the covered ball. I stacked the (2) 8 inch rounds, filled with cream cheese frosting, and crumb coated them in buttercream. This layer then received a smooth blanket of kelly green fondant. Support for the helmet layer was very crucial at this point. I trimmed down a 6" cake board to fit below the flat bottom of the styrofoam part, about 2 inch diameter. I located the center of the cake, and inserted 4 wooden dowels within the size of the mini cake board, and on top of that, I piped a couple dots buttercream. This will hold the cake board in place once it's on the wooden dowels and on the cake below. To create a more finished and cohesive look, I rolled out a rectangular piece of yellow fondant and laid it over the mini cake board and cake to create the collar of the helmet. I gently rubbed down on the fondant along the edge of the cake board so I could locate it. I wanted to make sure that the cake stayed centered. The helmet layer was gently lifted and positioned over the cake board and secure in place with a dollop of royal icing. You can also insert a long dowel through the whole cake to really hold it in place at this point. I know it's a lot to take in, but I hope my illustration to the left would help :)
 Once the cake was fully assembled, it was time to finish decorating! I rolled out ropes of fondant and created the signature windows of the Mark V, and trimmed off the edges of the collar. I then airbrushed the yellow parts of helmet with a gold shimmer for a metallic look. Another key element to the cake were the octopus tentacles that look like they are ready to envelop the Mark V. To create these, I rolled out long tapered ropes of red fondant and adhered them to the cake. I started at the base of the collar on the back side, and wrapped the tentacles around the helmet as realistic as I could. I then made small balls of light red fondant that I flattened with a ball tool for the suckers. I used a small detail brush and water to attach them to the tentacles. This made them so life-like! For the final touch, I inserted the gumpaste flowers to soften it up for the bride.
Welker Square Offset Wedding Cake
September 26, 2013
Last month, I had the opportunity to create a wonderful and meaningful cake for my co-worker and his fiancée. The cake was simple, yet elegant, with a touch of fun. When it came down to the decoration, I had free reign as long as the cake was offset and that their children were incorporated in the design. The offset cake symbolized their journey together, and their children were, of course, an important part of their lives. They were two individual families that will be joined as one on that special day.
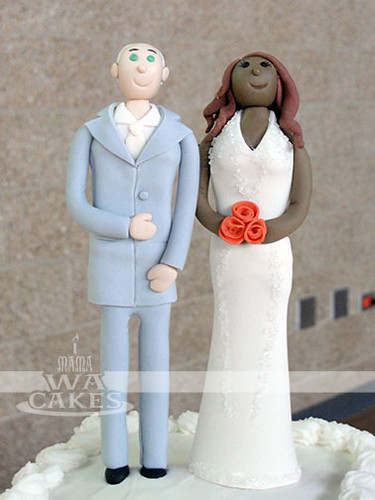
My preparation for this cake began a week prior to the wedding when I sculpted the bride and groom cake toppers. With their photos in hand, I began shaping the couple out of tinted gumpaste starting with the legs. The legs were created first and allowed to dry a few days before I built on the torso, neck, and then the head and face. I made sure that each added part were almost dried before moving on. The added weight would make the toppers slouch if the parts were still pliable. Who would want a slouchy bride and groom on their cake?! Once the body was completed, I added on their suit and wedding dress. I rolled out thin sheets of gumpaste, and cut them out as if I would with real clothing, piecing on the back and seamed with the front. The wedding dress was cut out as if it were an apron and wrapped around from the front to the back to form a halter style. Sugar sprinkles were then attached with simple syrup to represent the sequins on her dress. Once I was happy with the clothing, arms were added and attached in position. The final step is also an important step. No matter how general or unlike the real person the toppers may be, the perfect hair makes them recognizable and personal. I rolled out gumpaste that matched their hair colors, and pieced them together on their heads. I used different veining tools to give them movement, texture, and curls. Now they look just like them!
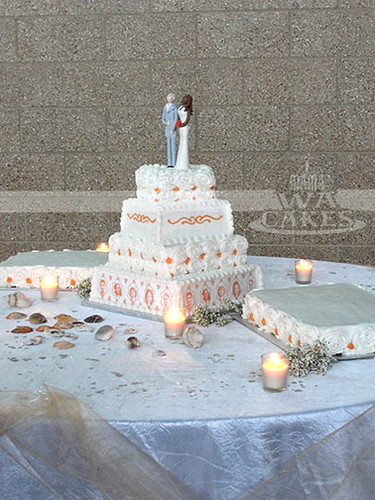
 Toppers done, and it's time for the cake... lots of cake. The cake was made up of 4 offset square tiers, rotated to the left until the corners almost met the edge of the one below. Each tier consisted of one layer of chocolate and one layer of vanilla cake, sandwiched around a layer of rich buttercream. These were then all iced in buttercream, alternating a smooth finish with one covered in large roses. I love covering whole cakes in large buttercream star tip roses. It is a simple technique that looks so dramatic. To incorporate the kids into the design, but keeping with the elegance of the cake, I created printed edible images of the kids in the coral accent color. I edited the images in Photoshop to remove the background, and then laid them out in Illustrator with decorative borders to compliment the overall design of the cake. I wanted their images to be part of the cake, not take away from elegance, or take away from the toppers. The edible images were attached to the buttercream on the bottom tier before it crusted over. I then pipes scallops along the edges. I finished off the cake with dots of coral in between the roses, and a simple scroll to tie in their wedding colors. The same treatment was duplicated on two sheet cakes that I also baked for extra servings. That is a great way to feed a large number of guest without having to pay for a super huge wedding cake.
Congrats to the S and N!
Mexican Concha (Shell) Recipe
September 13, 2013
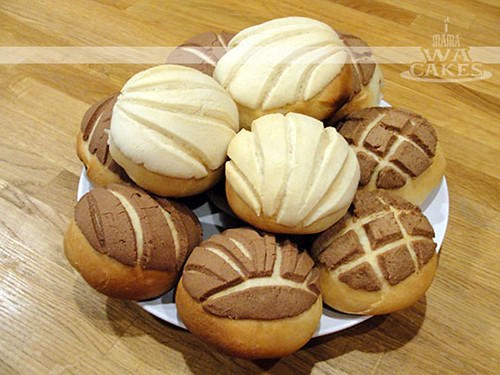
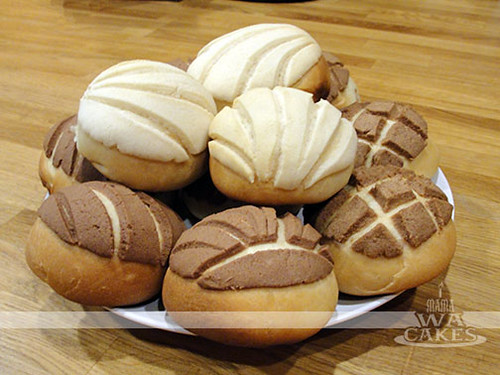
Whenever I walk into a panaderia, the warm inviting smell of cinnamon and sugar always lead me to these buns. They are warm and soft, pillowy and comforting. Yes, comforting. When the sugary topping dissolves on the taste buds, and instantly a smile comes across my face. And with that smile, I decided to try my hand at these delicious shells. Baking bread is definitely different from baking cakes... you have to let it grow ( or rise in this case ) and knead it with love. I was so proud of my first batch of Conchas that I decided to share this with you. Please let me know what you think. Enjoy!
Ingredients
- 3 teaspoons active dry yeast
- 1/2 cup warm water ( 105 degrees F to 115 degrees F or 40 to 46 celsius)
- 1/2 cup lukewarm milk ( scalded, then cooled)
- 1/3 cup granulated sugar
- 1/3 cup butter, softened
- 1 teaspoon salt
- 1 egg
- 3 1/2-4 cups all-purpose flour
- 1/3 cup granulated sugar
- 1/4 cup butter or 1/4 cup margarine
- 1/2 cup all-purpose flour
- 1 teaspoon ground cinnamon
- 1/4 teaspoon vanilla extract
- 1 1/2 teaspoons orange zest
Flavored Topping Dough
Directions
1. Dissolve yeast in warm water in large bowl.
2. Stir in milk, sugar, butter, salt, egg and 2 cups of the flour.
3. Mix until smooth.
4. Stir in enough remaining flour to make dough easy to handle.
5. Turn onto a lightly floured surface.
6. Knead until smooth and elastic, about 5 minutes.
7. Place in a large greased bowl, then turn greased side up.
8. Cover and let rise in a warm place until double, about 1 1/2 hours. (Tip: The longer you let it rise, the soft the bread.) While this is rising, prepare Flavored Topping Dough.
9. The dough is ready if it leaves an indentation when touched.
10. Punch dough down; divide into 12 equal pieces. Shape each piece into a ball; place on greased cookie sheet.
11. Divide the three flavored dough into 4 equal pieces.
12. Pat each piece into a 3-inch circle. Place 1 circle of Topping Dough on each ball of bread dough, shaping it down over the ball.
13. Make 5 or 6 cuts across the topping, using a table knife, to form a shell pattern.
14. Cover and let rise until double — about 40 minutes.
Heat oven to 375 degrees F (190 celsius). Bake buns until golden brown, about 20 minutes.
Flavored Topping Dough
1. Beat sugar and margarine until light and fluffy.
2. Stir in flour until mixture is the consistency of thick paste.
3. Divide into 3 equal parts.
4. Stir cinnamon into one part, vanilla extract into one part and orange peel into one part.
2. Stir in flour until mixture is the consistency of thick paste.
3. Divide into 3 equal parts.
4. Stir cinnamon into one part, vanilla extract into one part and orange peel into one part.
Pierson's Mickey Mouse Cake
July 19, 2013
A year ago, I made Pierson a Yo Gabba Gabba cake for his first birthday, and everyone loved it :) This year, when my friend asked if I could make him another cake, I was happy to say yes! But this time, it would be themed after everyone's favorite mouse...Mickey!
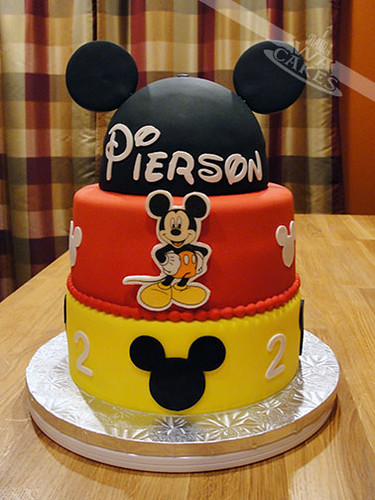
I wanted the cake to represent Mickey Mouse without looking exactly like him. The colors were ordered to copy the colors on the cheerful guy - Yellow (shoes), Red (shorts), and Black (ears). Get it? You got it!
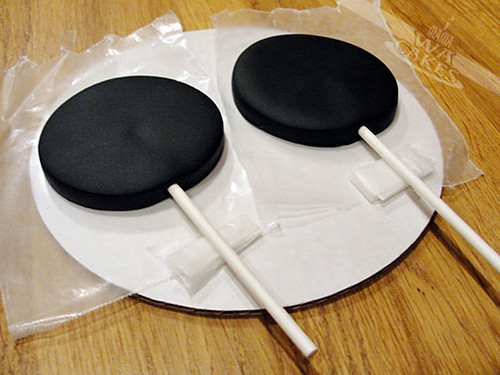
A few days prior to baking, I formed the recognizable mouse ears. I rolled out a thick sheet of black fondant mixed with tylose powder. That helps harden the fondant like gumpaste. I then proceeded to cut out the two ears with the help of a 3 inch diameter round cutter. 6 inch popsicle sticks were then gently inserted with a touch of gum glue. These were left to dry completely so that they would be nice and firm to handle. Another element that I made ahead of time was the edible plaque of Mickey Mouse. I found an image online and sized it to what I needed, and created a halo around him. I did this because I like the contrast of the white against the cake's color. I brushed on a thin layer of clear piping gel onto a thin sheet of gumpaste, and adhered the edible image to it. I allowed it to set a few minutes before I cut it out with an small pen knife.
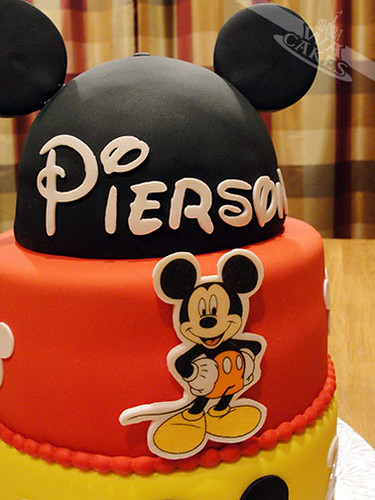 The cake itself was as yummy as it looks! I started with two 9 inch layers, and two 8 inch layers of rich chocolate cake. These were then filled with a toasty, gooey coconut filling. I love these two flavors together, Yum! The Mickey hat was also the same flavor, but was baked in half of a Wilton Sports Ball Pan. All the layers were then covered in fondant and stacked, making sure that they level and straight. Fondant decorations were then cut out to embellish the sides of the bottom two cakes. Pierson's name was cut out in the same style as the Disney's logo, of course. It's starting to look like a hat I once owned when I was young. For final touches, I attached the edible plaque to the cake with some melted candy coating, and carefully inserted the ears into the hat part, making sure they were even. The finished cake almost had me singing, "M-I-C-K-E-Y, M-O-U-S-E!"
I wanted the cake to represent Mickey Mouse without looking exactly like him. The colors were ordered to copy the colors on the cheerful guy - Yellow (shoes), Red (shorts), and Black (ears). Get it? You got it!
A few days prior to baking, I formed the recognizable mouse ears. I rolled out a thick sheet of black fondant mixed with tylose powder. That helps harden the fondant like gumpaste. I then proceeded to cut out the two ears with the help of a 3 inch diameter round cutter. 6 inch popsicle sticks were then gently inserted with a touch of gum glue. These were left to dry completely so that they would be nice and firm to handle. Another element that I made ahead of time was the edible plaque of Mickey Mouse. I found an image online and sized it to what I needed, and created a halo around him. I did this because I like the contrast of the white against the cake's color. I brushed on a thin layer of clear piping gel onto a thin sheet of gumpaste, and adhered the edible image to it. I allowed it to set a few minutes before I cut it out with an small pen knife.
 The cake itself was as yummy as it looks! I started with two 9 inch layers, and two 8 inch layers of rich chocolate cake. These were then filled with a toasty, gooey coconut filling. I love these two flavors together, Yum! The Mickey hat was also the same flavor, but was baked in half of a Wilton Sports Ball Pan. All the layers were then covered in fondant and stacked, making sure that they level and straight. Fondant decorations were then cut out to embellish the sides of the bottom two cakes. Pierson's name was cut out in the same style as the Disney's logo, of course. It's starting to look like a hat I once owned when I was young. For final touches, I attached the edible plaque to the cake with some melted candy coating, and carefully inserted the ears into the hat part, making sure they were even. The finished cake almost had me singing, "M-I-C-K-E-Y, M-O-U-S-E!"
Subscribe to:
Posts (Atom)




Social Icons