Baby Giraffe Baby Shower Cake for Steffanie
January 27, 2011
My friend Alani came to me and asked if I was interested in making a baby shower cake that she was throwing for her friend... "Yes!" Why wouldn't I?
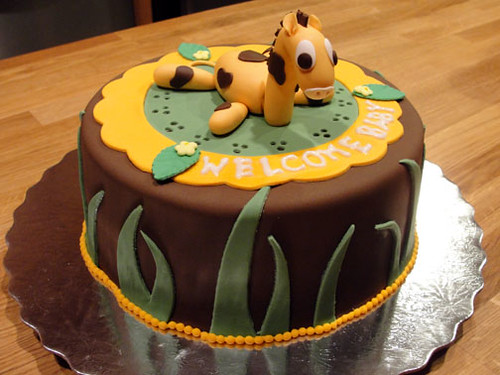
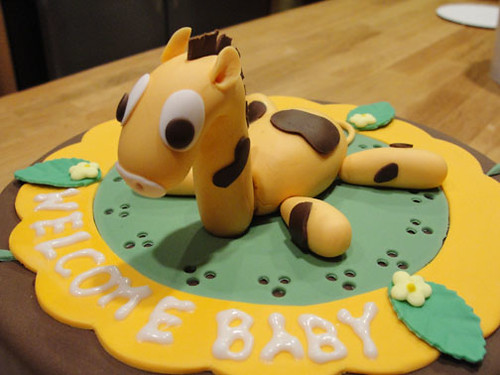
With a small number of girls attending, I decided to make a two layered 8" cake. The flavor chosen was a milk chocolate cake filled with strawberry puree. For the look of the cake, it was to reflect the jungle theme. I decided to focus on the giraffe that was used on the invitations. I automatically had a vision of a giraffe joey laying on its tummy. How cute!
I first started with each part of the giraffe and shaped it out of a 50/50 mixture of gumpaste and fondant. A lollipop stick was used for the structure of the neck and head. I used a styrofoam cup to prop up the giraffe head as it dried. I shaped the body and made indentations where the limbs would fit, and left these to harden a day prior to baking.
My basic chocolate cake recipe was used for the 2 layers of cake, which was cooled completely and placed in the fridge for 15 mins before handling. Chocolate is the hardest cake to carve, handle, or to ice because of it's super soft texture. Chilling it for a few minutes helps with that problem. I torted the two layers and filled each one with a generous scoop of strawberry puree filling. I made sure leave a good amount of chunky bits for full strawberry experience. The layers of cakes were stacked high and leveled before I thinly iced the entire cake with a smooth, velvety buttercream. The cake was then covered with my fave chocolate fondant and smoothed to perfection. Green colored vanilla fondant was then rolled out thinly for the eyelet circle and various blades of grass that accented the sides. I used a ribbon cutter to create the yellow frame around the eyelet circle for a lovely contrast of colors. The giraffe was centered on the cake and sugar-glued into position. To finish of the cake, a few more leaves, royal icing drop flowers, and a beading of yellow fondant around the base. Congrats to Steffanie!
Time to play ball! A baseball mitt cake for Brian
January 26, 2011
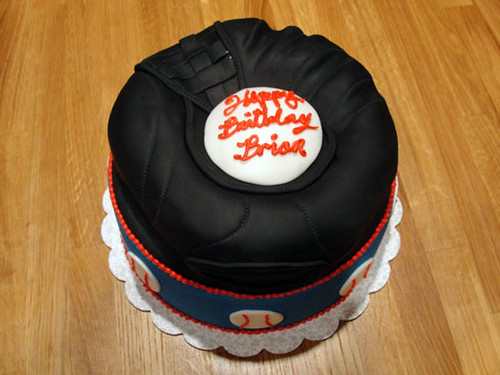
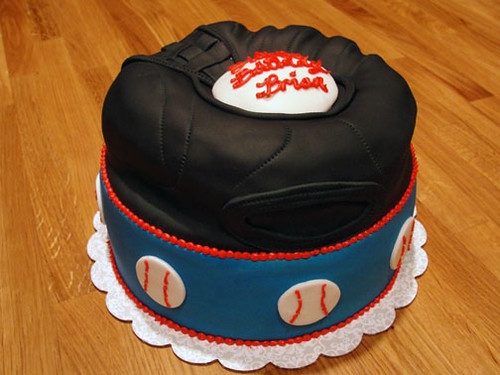
What do you do when you order a gift and it doesn't get there in time?! You order a cake! That is exactly what Annie did for her fiance for his birthday. She custom ordered a baseball mitt for Brian, but it wouldn't be delivered in time for his small family gathering. After discussing ideas with Annie, we decided on a 8" round cake topped off with a dimensional mitt that wouldn't be short of details.
The cake started with an image of the closed-web mitt, and a moist red velvet cake. The bottom cake was a 3" tall round, torted and filled with cream cheese filling. The mitt layer of the cake was carved out of a 2" layer of red velvet. I took a picture of the ordered mitt and sized it proportionally to the diameter of the cake and printed a template that I used to carve the cake. I exaggerated some of the cuts to ensure that they wouldn't be lost once covered with fondant. I then smoothed on a thin layer of cream cheese flavored buttercream over the entire cake. The top portion of the cake received a smooth blanket of black fondant, and the bottom was covered with a wide strip of bright blue. Using a quilting wheel, leather stitches were imprinted to create a realistic sewing pattern. To create the closed-web look of the mitt, I weaved strips of black fondant together and then trimmed to the proper shape and size. A mitt can't be complete with out the ball! I used this area to pipe out a message to the birthday boy. To finish off the cake, baseballs were cut out of white fondant and the red accents were piped on with buttercream. Time to play ball!. . . I mean eat cake!
LV Cake made for a Fashionista!
December 20, 2010
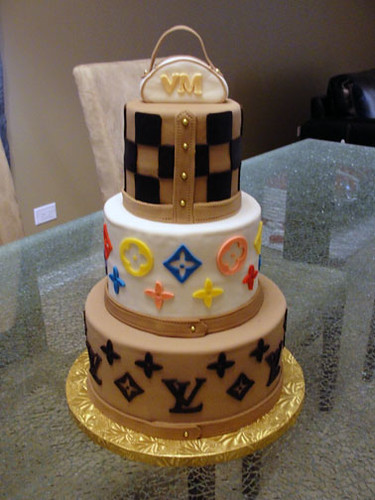
Early November, I was graced with the chance to create a chic and trendy cake for a lovely lady named Victoria. She had always wanted to throw a big production birthday party, and this was the year. The cake had match her out-going personality, and represent what she loves. As we went over the preliminary questions, I couldn't help to notice that the luxurious LV was thrown around a few times. She did try to clarify that she wasn't obsessed with the celebrated brand..."Of course not," I replied. Did I mention that she works for Louis Vuitton? Okay okay, she's not obsessed, just a devoted employee :)
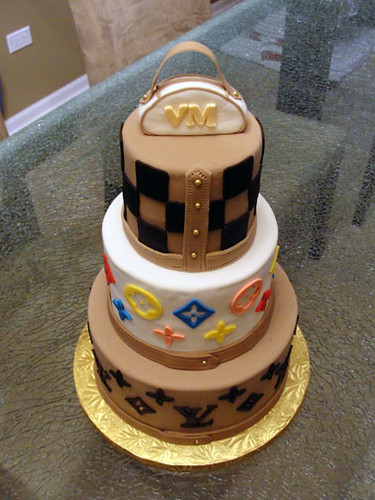
The lovely three levels were a series of 8 inch, 6 inch, and 4 inch round cakes stacked together for a modern appeal. Victoria jumped on my Mexican Chocolate cake recipe filled with a sweet and spicy cinnamon buttercream. Two layers were torted and filled to create a 4 inch high level, and then covered in the same yummy buttercream. I covered the bottom and top layers in a light caramel color fondant, while the middle layer is smoothed in a blanket of pure white fondant.
With the three levels of canvas completed, it's time for the fun stuff! Each level represented one of the three coveted signature LV patterns. The bottom modeled the timeless LV monogram that every girl loves. Each individual piece was cut out of dark chocolate fondant, which taste like a Tootsie Roll, and attached on top of the light caramel constrast. The middle level adorned the fun and young Multicolored LV monogram, giving the cake a bit of splash of color. The top level was then decorated in the fashionably unisex Damier checker pattern that everyone loves. This lovely cake could not be complete without the finishing details of stitching along the ribbons of leather, and the shine of gold dragees. A mini purse adorned with Victoria's initials finish of the top of this birthday cake. What a fab birthday!
A Musical Sweet 16 for Raphaella
November 11, 2010
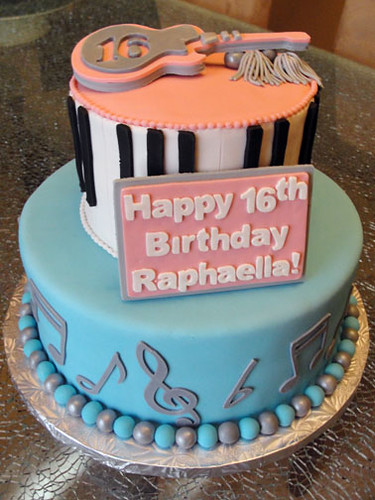
A few weeks ago, a long time friend of mine left me a message about a cake for her niece's Sweet 16th birthday. She wanted to give her a pretty cake that was custom made for her and her alone. Cecilia and I went over ideas and details, from cake flavor to the shade of blue. Most of the cakes I make are my interpretation and designs based on themes or personality traits of the recipient. This cake was entirely designed by Cecilia, and I had to make her vision a reality.
Raphaella was a pepped up cheerleader with an appreciation for music. Hence, the theme of this sweet 16 cake came naturally. The part that took a little pondering about was the cake itself. This cake would be the introduction of fondant to a group of whipped icing devotees. Did I mention that they were used to having fresh fruit in their cakes? That is a no-no when it comes to an icing that prefers the tabletop in an air-conditioned room over a fridge. Exposing fondant to extra moisture would created a collapsed catastrophe. Not to mention that refrigeration would make the fondant rock hard. Coming from a similar background, I completely understood.
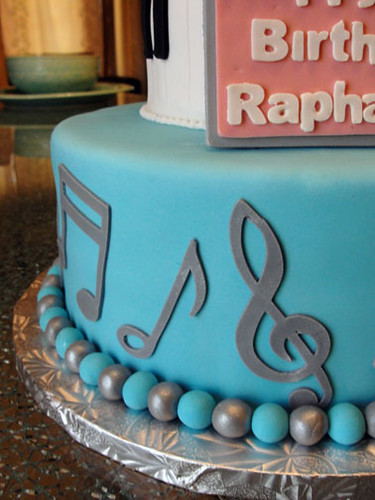
This cake consisted of two stacked layers of coffee flavored cake sandwiched around velvety layers of mocha whipped icing... hint: Wilton's! I used their mix and added cocoa and instant coffee for a rich mocha flavor. This recipe can withstand being at room temp up to three days so don't assemble the cake too ahead of serving. Each 4" stacked cake then received a thin blanket of buttercream and it was time to decorate! The bottom level was a canvas of that "Tiffany" blue that all girls love, while dark silvery musical notes danced whimsically around its sides. The top level was covered in Raphaella's fave pink and surrounded by black and white piano keys that I wanted to play "Hot Cross Buns" on... sorry, that's all the piano I could remember. The other key elements to this cake was the pink guitar and the message plaque. These were made a day ahead out of gumpaste and left to dry prior to assembly. The top level was finished off with petite strings of pearls, and the bottom was circled by alternating blue and silver fondant balls. Now that's a sweet 16!
Subscribe to:
Posts (Atom)



Social Icons