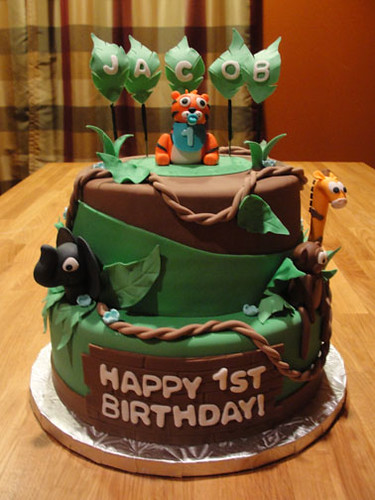
 Jungle cakes have been a common theme for me, but this one was special. This one features a cute tiger named Jacob, and it was his 1st birthday!
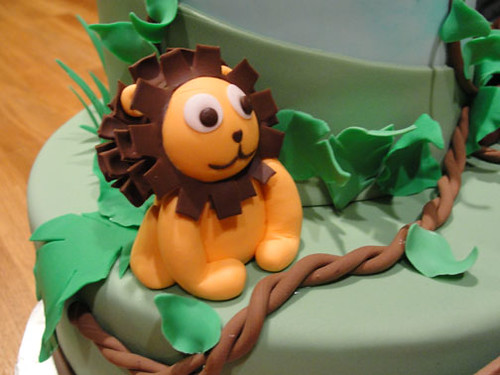
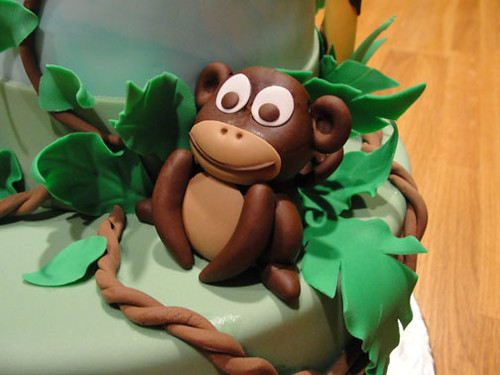
When Carol messaged me about making a cake for Jacob, she only had one request. Jacob was born under the Chinese horoscope year of the tiger, and that set the tone for this cake. She wasn't sure if she wanted a stacked cake or if she wanted a small 3D cake in the shape of the a tiger. For the number of servings, I recommended a stacked construction, adorned with various baby animals and the very special tiger on top. I just love to make gumpaste animals. They are the cutest things as they come to life in my hands. The little guys were created one week ahead to allow for proper drying time ( and any falling limbs ). I then rolled out a thin sheet of green 50/50 mixture of fondant and gumpaste, and cut out leaves using a cutter. To give them a nice life like movement, a ball tool was used ruffle the edges on top of a thin foam pad. Larger leaves were created and placed on wires to adorn Jacob's name on top of the cake.
The stacked cake started with two 10" layers of lemon cake sandwiched around alternating layers of raspberry puree and bavarian cream. The top level was two 8" layers of the same cake and yummy filling. The two were then crumb coated with buttercream, smoothing out any imperfections. The bottom layer received a blanket of green fondant and was smoothed to perfection. The top was covered in a chocolate fondant and trimmed in the matching green asymmetrically. This gives the appearance of rising grassland. The very bottom was trimmed in a thin ribbon of chocolate fondant. Using piping gel, I attached the animals in the appropriate positions and accented them with the jungle foliage. Using a wooden plank imprint, I created a message sign just for the birthday boy. This was affixed to the front of the cake with a little gum glue. Winding vines and blades of grass gave this cake the final touches it needed. Happy birthday to the little tiger!
Last Ride of the Season! Snowboarder cake for Tré
April 21, 2011
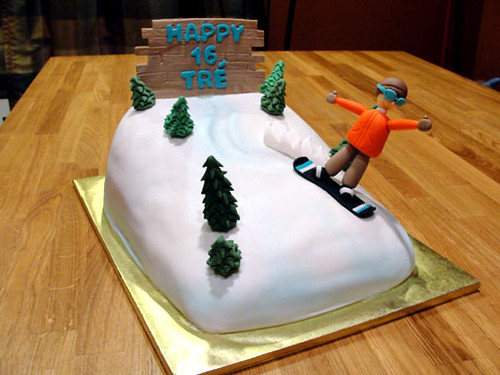
As we neared the end of the winter sports' season, I had a chance to hop back on my board and carve some snow... and a cake for Tré's 16th birthday. Jennifer had requested a retro oven cake for her sister, Jill, last year. This time, she had requested a cake for her son, Tré. For his 16th birthday, she had outfitted him in new snowboarding gear, and she wanted to carry that through to the cake.
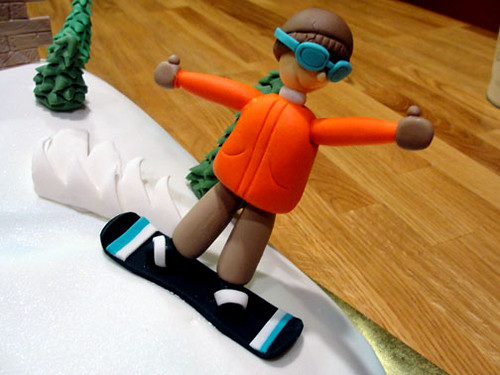
 I started with the star of the cake and began shaping a miniature Tré. Jennifer gave me a list of of Tré's new gear, and I began modeling him out of 50/50 mixture of gumpaste and fondant. Starting with his torso, a bright orange jacket created to keep him warm. I created indents where I could join his limbs with a small ball tool. Next up was his head where I used the torso as a size reference to keep it proportionate. Who wants a big noggin? A cute little ball was attached for his nose, and with this in place, I can reference the placement of the other facial elements. The hat was created and fitted over his head by shaping a round circle around an end of my small rolling pin. Details of the ribbing was then notched in using the back of an knife. To complete the head, teal colored goggles were created out of gumpaste and attached with a little water. His limbs was the next crucial step because his legs would be the support of the body, and I would hate for him to fall apart. I started with skewers sticks for strength, and shaped his legs individually with khaki colored 50/50 mixture, and made sure his black boots were secure to the sticks. I left a good inch of skewer stick exposed on top in order to insert the legs into the torso. The arms were shaped around tooth picks and then attached to the torso where I had indents earlier. This gives a seamless and cleaner look. No snowboarder is complete without a board, and Tré just picked up a black one with white and teal details. I cut out the shape of board from a flat sheet of black gumpaste, and left it to dry in a former I created out of cardboard to give it's signature bend at the nose and tail. I also made two small holes where his boots would be positioned on the board for the skewer sticks to go through. Stripes of the white and teal were attached with a touch of water. Time for Tré to sit aside while I work on the slope!
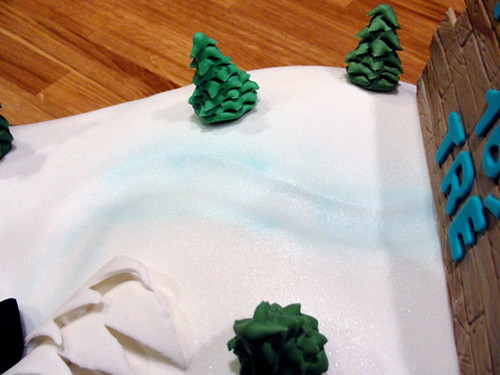 The snowy slope began as 9 x 13 layers of vanilla cake and vanilla buttercream. They were torted and stacked to the right height just so I could slowly carve at it. With a serrated knife, I slowly cut away thin pieces until I got a smooth shape and transition. My son loves this part because he gets to eat the unwanted scrapes. After removing crumbs from the cake with a soft pastry brush, I laid on a thin layer of buttercream. I also used it to smooth out sharp corners. The entire cake was then covered in a smooth white fondant. The color alone wasn't enough to represent snow. We all know that when it's viewed in certain lights, it shimmers. This is where my new toy comes in... airbrushing! Using edible airbrush color, I covered the entire cake with a pearl sheen, then went back in and add a blue sheen for shadows and to bring out some details. The slope was then completed with gumpaste pine trees, and a big message board for the birthday boy. Tré was then attached to the cake, followed by a wave of snow drift for a motion effect. What snowboarder wouldn't love this cake! Happy 16!
KAW...KAW! An Angry Birds Baby Shower Cake!
March 28, 2011
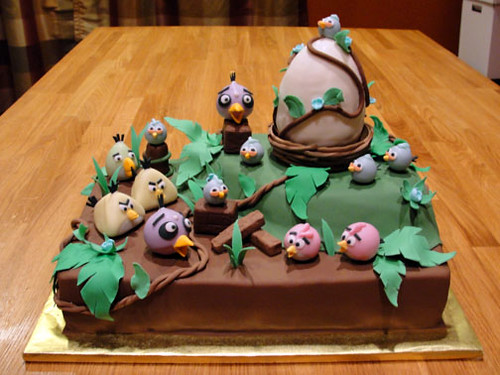
Late January, I was given an interesting challenge by my friend, Mistey. She was designing a baby shower invitation for our friend, Chhunnary. When she told me what she wanted as the theme, I was excited. I have to admit...I am a bit of an addict, and who isn't?! Everyone loves Angry Birds! I just couldn't wait to bring this pastel Angry Birds jungle cake to life.
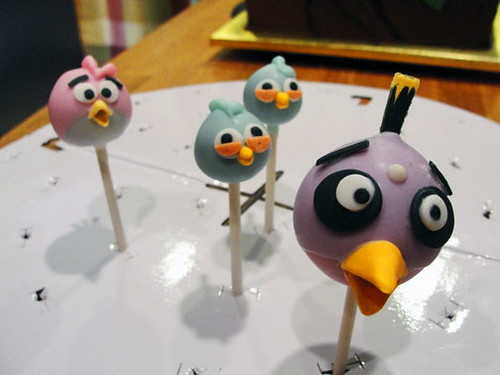
Taking cue from the invitation, I wanted to incorporate the various birds, a nest, and an egg into a lively jungle scene. Unlike my previous cakes, this one combined the multiple elements of cake carving, fondant and gumpaste work, and cake pops! Yes, those little detailed birdies are cake on a stick.
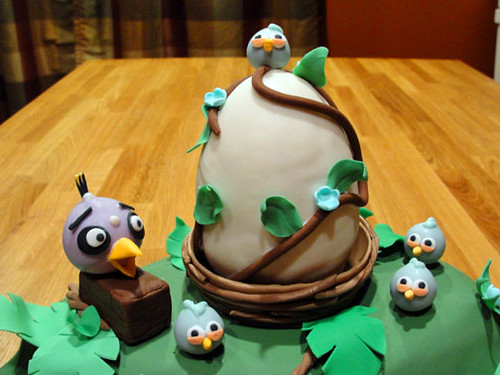
Starting a week prior to the baby shower, I cut out various leaves out of gumpaste and allowed them to dry in formers for a life-like shape. These will give my cake canvas a burst of green foliage. The next item that I had to create was the detailed nest. Using a small bowl as a former, I draped a sheet of brown gumpaste over the bottom and cut it to the right height for the nest's base. This was left to dry over the next two days. Using a dark and a light shade of brown gumpaste, I kneaded them together just enough to create wood-like swirls for twigs used in the nest. Thin ropes in various lengths were then rolled out by hand and then shaped over a small bucket for the perfect curvature. After the parts of the nest were dried completely, I attached the curved twigs around the nest base with a touch of piping gel. This stuff holds like wonder for heavier pieces!
The next item on the list that required some patience and steady hands were the Angry Birds! I baked a 9" x 13" pan of my chocolate cake recipe and let it cool for several hours until completely cooled. Now comes my favorite part about cake pops...DESTROY! Yes, you bake a cake just to break it up...make sure there are no chunks. I crumbled up half of the cake and saved the other half for the cake itself. Once the cake was a fine crumbled mess, I mixed in about a quarter cup of cream cheese frosting and combined with large spoon. With my hands, I rolled out the various sizes and shape of the different birds. A quick 15 minutes trip into the freezer helped firm them up for handling, and then were kept in the fridge to keep them cool until I coated them. Using white candy coating and candy coloring, I mixed up the pastel variations of the birds, and shaped the various beaks, crowns, and tails out of gumpaste. Lollipop sticks were inserted into each bird by first dipping one end in the candy coating and then inserted in the shaped cake balls. Immediately, I coated each one in the smooth candy coating and inserted into a florist block until the candy dried. I then was able to attach the beaks, and feathers by dotting on candy coating with a toothpick. Remember that huge egg? That is actually a giant cake ball that I poured white candy coating over on a cooling rack.
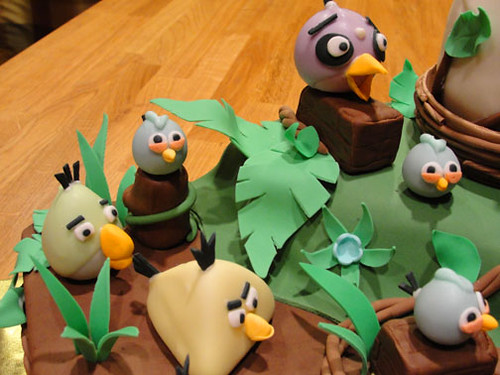
The edible jungle was a 9" x 13" sheet of the same chocolate cake that I had torted and filled with chocolate bavarian cream. Remember the other half of the cake that I had saved from the cake balls? I torted and filled it, and placed it on top of my larger cake for more dimension. I then carved the cake slightly with a serrated knife for a smooth hilly slope. The entire cake was thinly iced with buttercream and then covered in a smooth blanket of rich dark chocolate fondant. Using a small circle cutter, I imprinted a series of rock formations on the sides of the tallest corner for a little added detail. I then rolled out a section of green fondant to place on top of the hill to create a lush jungle floor. To add familiar elements to the cake, cereal treats were covered in a light chocolate fondant to create crates and wooden planks. There's even a small tree trunk for one of the birds to perch on! With the main part decorated, it was time to add the Angry Birds and the nested egg. Did I mention how heavy the egg was? It weighed a total of 5 pounds by itself! Normally, OI wouldn't have to worry about support dowels in a sheet cake like this, but this was going to require some help to not squash the cake. I figured out where I wanted to place the egg and inserted 4 cake dowels cut to the correct height. Using some piping gel, I first attached the nest and then a small cake board cut to size sits in the nest's interior. A dab of buttercream holds the giant egg in it place. The birds are then inserted into the cake in various positions and the lollipop sticks are trimmed to fit. Using a clay gun, I extruded long ropes of chocolate fondant and wound them together to create a series of vines that were attached with a brush of piping gel, and wraps around the egg. The leaves and little blue flowers I made earlier bring this pastel jungle to life. Congrats to Anh and Chhunnary, and welcome baby Evelyn!
Cute Jungle Cake...hear me roar!
February 16, 2011
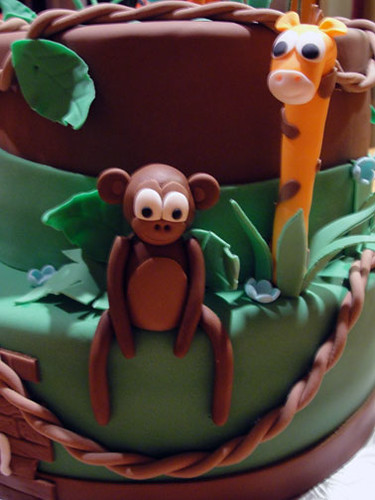
There is nothing cuter than a jungle of cute baby animals... oh yes, there is! A jungle cake with darling baby animals awaiting a new friend to arrive! This baby shower cake was inspired by a photo that Wendy had sent me, and her only criteria was that the animals had to be cute. I think I can pull that off.
This cake required some major time management and prepping. A week prior to delivery, I handmade a large amount of various leaves and grass out of a 50/50 gumpaste and fondant mixture. Making more than I needed ensured that I would have some on hand for any accidents that may occur. "Knock on wood!" I rolled out the green tinted mixture as thin as I could, and cut out different shapes of leaves. I then ran a ball tool over the outer edges of the leaves for a life-like movement.
After completing the leaves, I combined tan colored gumpaste with a small amount of dark chocolate fondant. This was used to create the wooden message sign. I kneaded the two colors together, but not combining them completely to create the markings and swirls found in real wood. The mixture was then rolled out flat, imprinted with a plastic mold to create the planks of wood, and then trimmed. This piece had to dry completely before using, so a light dusting of confectionery sugar helps.
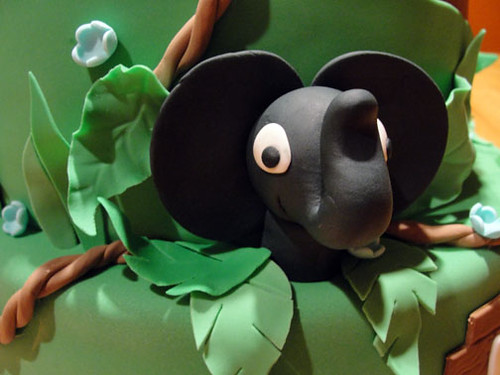
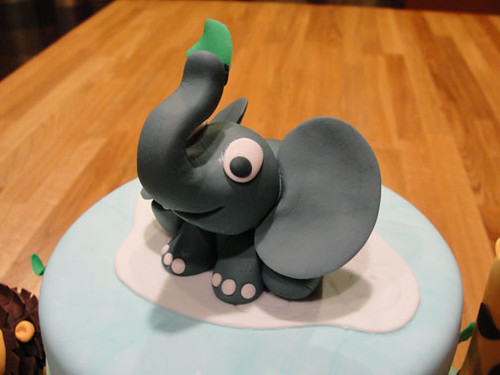
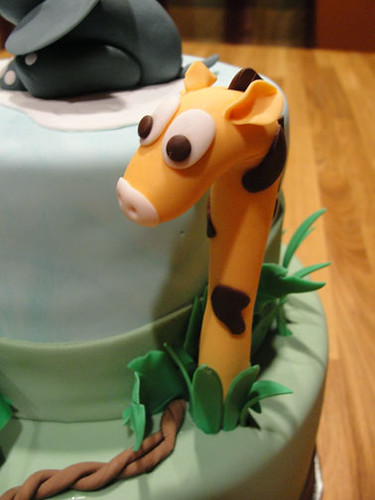
Time for some baby animals! First, I kneaded a small amount of 50/50 in each color that I would need. Using an image of each animal, I hand-shaped each part of the cute little guys and assembled them with a touch of gum glue. The elephant's head was propped on some balled-up tissue until it set in place. Other details such as their signature tails were left to harden before I attached them because of their delicate thickness. The elephant's ears were left to dry in a shallow flower former to ensure that they wouldn't plop over. The giraffe was shaped around a bamboo skewer, and was left to harden with its head propped on a cup until stiffened. The small details of the animals' manes, paws, and large eyes add the special touch of cuteness that Wendy wanted for her friend.
With the leaves and animals done, it was time to bake up the cute jungle home for them. This cake started with a 6" round vanilla cake filled with bavarian cream. After lightly icing the vanilla cake with a thin layer of buttercream, a blanket of marbled white and pale blue fondant was laid down. This looked like perfect a layer of clouds in a beautiful blue sky. An asymmetrical strip of pale green fondant was wrapped around the bottom portion to represent grassy hills.
The bottom portion was a 10" dark chocolate cake filled with chocolate bavarian cream. Having the option of two flavors is better than just one! I thinly iced the cake with buttercream and smoothed on a layer of the same green fondant used on the lower half of the 6" cake. The two cakes were then stacked on a half inch foil drum, but not centered. I offset the cake towards one edge to further the illusion of a hill. Once I was happy with the position of the cake, I ran a cake dowel down the two cakes and into the foil drum. Assembly is done and here comes the fun part! Time to decorate!
I finished the bottom of the cake with a ribbon of chocolate fondant, and rolled some out into long ropes that I twisted together to create vines. I placed each assembled animal onto the cake and secured each one with a brush of piping gel. The giraffe was inserted on the side, peeping out of a little bush. More leaves and grass blades were attached with piping gel to create the jungle scene. The elephant was the new baby, floating down from heaven on a cloud. I rolled out white fondant and ran a veining tool over it to create cloud-like swirls. The elephant was then attached on top. With the animals and leaves in place, I draped and wrapped the vines around the cake. The final piece was the wooden sign that was propped in front of the cake, and a message was piped on with buttercream. Welcome to the world, Baby!


Subscribe to:
Posts (Atom)







Social Icons