
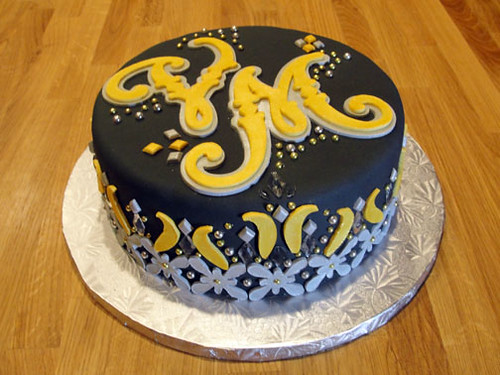
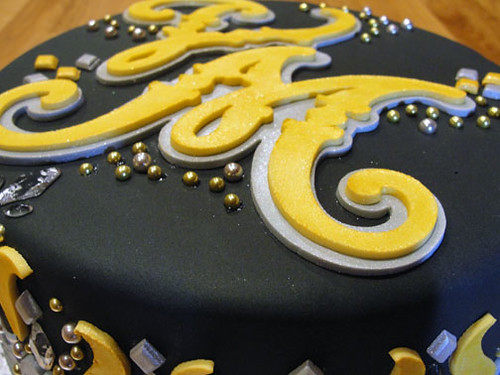
Rocker Chic Balmain Cake
December 13, 2011

Sunny days for Sesame Street cakes!
November 2, 2011
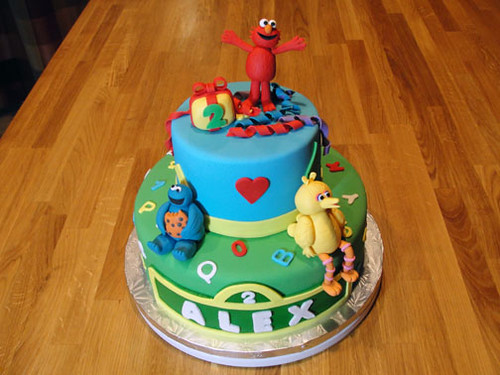
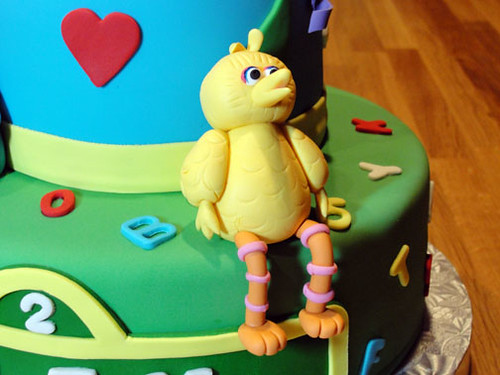
 These birthday cakes were definitely a blast from the past. It takes me back to my childhood, where I sat in front of the glowing tube, singing out loud - "Sunny Day, Sweeping the clouds away. On my way to where the air is sweet...". Sesame Street is one children show that has tested the hands of time, and has touched every generation thus far. I knew the characters like the back of my hands. I only spent my entire childhood watching it. So when my friend, Peter, asked to make a cake for his niece, I gladly agreed. Then a week later, my friend Michelle requested one for daughter Oneida! Sesame Street Fans all around :)
It seems as though that everyone's favorite characters are Elmo, Cookie Monster, or Big Bird! Being the sugar model fanatic that I am, I created sugar models of these lovable characters. Starting with the torsos of each one, I rolled out balls of 50/50 mixture of gumpaste and fondant. Each ball were rolled and shaped accordingly to create the limbs for each character. The heads were then shaped, using the body for sizing. I didn't want my sugar models to look like bobble heads. A toothpick is inserted into the torso as support for the heads. Remember to use gum glue! Brush it on lightly to hold everything together. I placed the sugar models aside to dry.

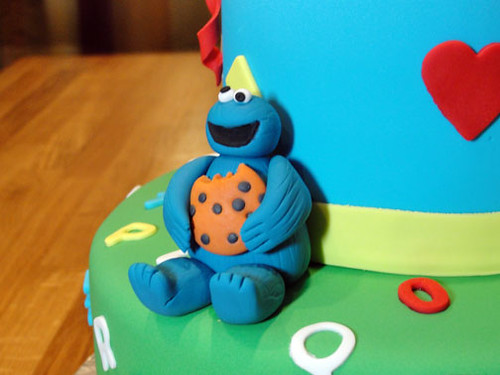

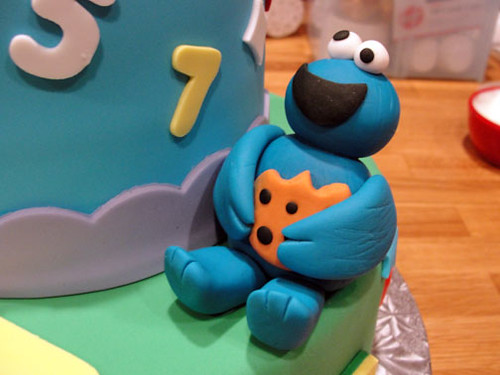
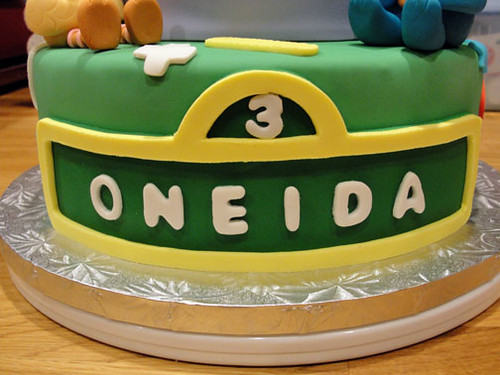
Time to move onto the cakes! I started with a classic vanilla cake batter, and baked them into two 10", and two 6" layers for Alex. Oneida's was a bit different with a 10" of yellow cake, topped off with a 6" of chocolate goodness. after baking, I allowed these to cool completely before working with them. Applying icing to a warm cake will only leave you with a melting mess of sugar and butter. The cakes were then torted and filled. For Alex's cake, I filled it with raspberry puree. It's a perfect balance of sweet and tartness! Oneida's was filled with buttercream in the bottom layer, and chocolate bavarian cream on top. I then cover the stacked layers with a food safe bag, and left them on the counter for a few hours. This gives the torted layers a chance to settle, and help eliminate that ugly bulge that can happen on the sides of a cake. The cakes are then lightly crumb coated with buttercream, and then covered with a thin blanket of fondant. The 6" cake is then stacked onto the 10" cake with the support of dowel rods. Fondant elements were cut out and attached to the cake with a touch of water brushed onto the backside. Each one received the a customized Sesame Street sign boasting the names of each birthday girl. For a celebratory touch, I created streamers by wrapping thin strips of fondant around dowel rods and allowed them dry to hold their curly fun shape.

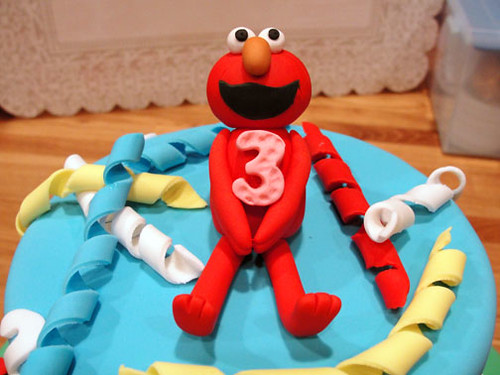
 Oneida's Sesame street fun continued with rich chocolate cupcakes topped of with buttercream and a fondant Elmo! The Elmo toppers were cut out of fondant and assembled a day ahead. This allowed for ample drying time. The cupcakes were baked and allowed to cool before I piped on red and purple buttercream. The Elmo toppers were then placed on top of each cupcake at an angle.
I hope that these treats brought some sunny days into the world of the birthday girls! Alex and Oneida, I hope you had as much fun as I did!
It's time for a Yo Gabba Gabba cake!
October 3, 2011

A few months ago, John contacted me about a cake for his niece. He's a long time friend of the family, and I was happy to take on what ever he had in mind. I learned that her favorite character was Foofa, the cute pink one with the flower on her head. John sent me several examples of Yo Gabba Gabba cakes, and told me what his sister liked about each one. I took those ideas came up with a design that showcased the four different character themes, and sugar models of the five characters - Muno, Brobee, Toodee, Plex, and Foofa. This cake was meant to feed around 50 guests, standing 3 levels stacked high of vanilla and raspberry goodness!
The week prior to delivery, I spent hours watching a dvd that I had borrowed from a friend and taking notes. I sketched out the characters, and printed out images I found on the internet for references. Using gumpaste and fondant, I started on the sugar models of the characters. Each one was created in the same order, starting with the torso, the head, and then the limbs. A great thing I've learned through my past experience is that creating the head after the torso helps keep everything in proportion. I've had to remodel figures because the heads were too big for the body. On the torsos, I used a ball tool to created sockets for the arms and legs to fit into. This creates a cleaner look. Skewer sticks and toothpicks help the legs support the body upright and can be used as inserts onto the cake. I crumbled up tissue under any areas that needed support while drying to reduce any hard blemishes. The faces were done last with the help of small round cutters, or cut freehand with an exacto knife. Small details such as the lashes were drawn on with a fine tip edible marker. They are the best thing to purchase if you want to create sugar figures or draw very fine lines on a cake.

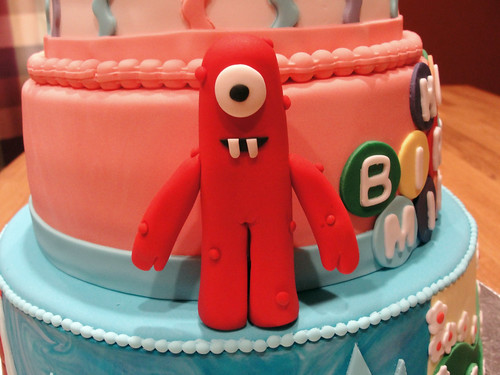
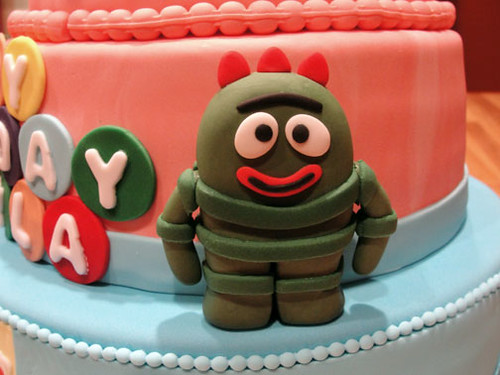
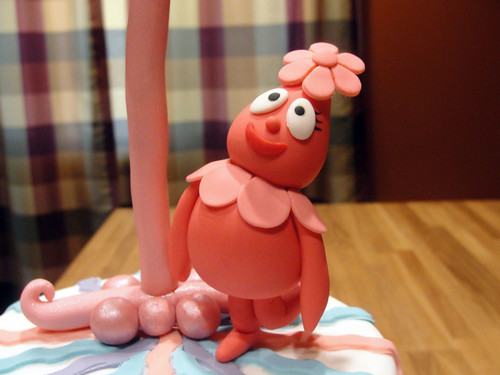
With the figures done and left aside to dry, it was time to create the cake. Each level of cake had it's own design element that required attention. The bottom level showcased the four homes of the characters - Munoland, Brobeeland, Toodeeland, and Foofaland. Each one also represented the 4 seasons of summer, fall, winter, and spring. To divide the cake evenly into the 4 scenes, I measured the circumference of the cake after it was torted and covered with a bright blue fondant. This gave me the correct width of space for each scene. I cut out a fondant rectangle of each background color and attached them to the cake with a little water. Using the print outs as a reference, I cut out elements of each scene and attached them to the cake in layers for a dimensional look just like the show. Colors play a very huge part in each of the scenes so using techniques such as marbling or color blocking helped. Marbling two shades of blue allowed for a cold winter sky in Toodeeland. Do you see the rock formations in Munoland? Those were created by laying down thin ropes of different colored fondant next to each other and rolling it out at once. I then cut out the shapes of the rock formations with a knife.

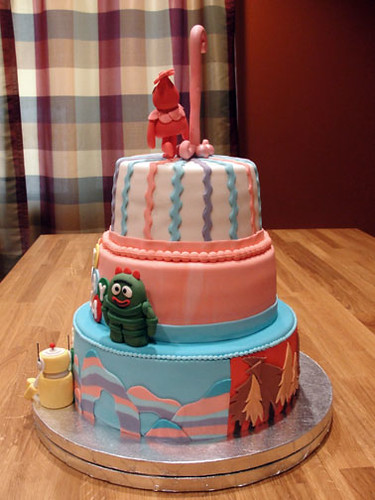
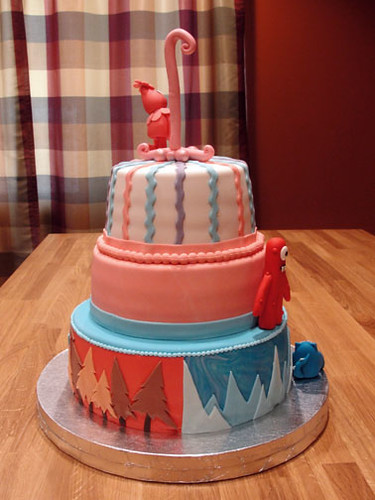
The second level was torted and covered with a marbled pink fondant. I cut out 3/4 inch circles out of different color fondant and laid them out to create a bright message board where "Happy birthday Mikayla" in white fondant would sit. I arranged the message on a parchment paper before attaching it to the cake just to make sure I had the spacing right. A ribbon of the same blue fondant from the layer below accents the bottom of the second level. The top level was covered in white and received a fun, whimsical striping treatment. I used a wavy ribbon cutter and cut out 1/4 inch stripes of light blue, purple, and light pink fondant. I attached these across the top and down the sides of the cake, alternating in colors. I don't like the bump that can be creating by overlapping ribbons on the top of the cake, so my ribbons only really meet in the center and don't really overlap. I cut off the areas that on top of another ribbon to create a seamless fit. This was then accented with a ribbon and pink fondant beading. The characters were then inserted into the cake and secured with a touch of piping gel. To finish off the cake, I rolled out a whimsical #1 supported by a wooden skewer. I brushed on some shimmering rose dust to give it a little bit of shine. Once this was dried, I inserted it into the cake and yelled, "Yo Gabba Gabba!"

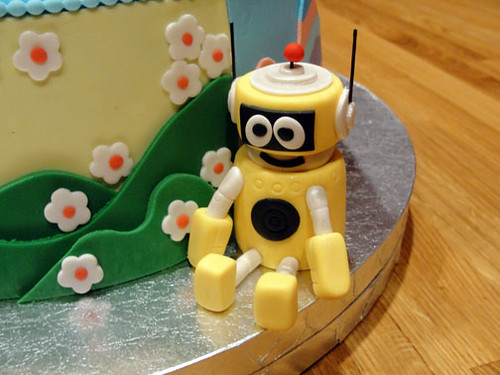
Robot Cake For My Mateo's 2nd Birthday!
September 16, 2011
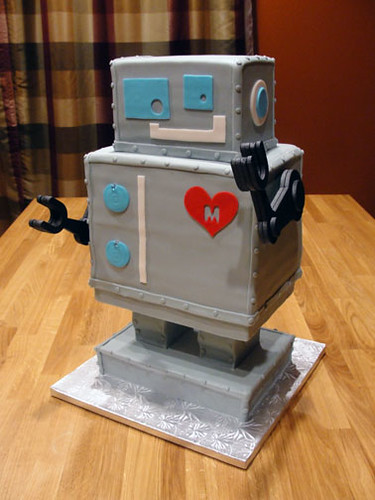
I have to admit. I was super excited to do this cake at first, but then I got really nervous once I started planning it out. I had to figure out how I was going created legs for the cake. I didn't want the robot to be sitting. I wanted it to stand upright. Luckily, I was able to pick the brains of a few structural designers I know and came up with a solution. I used high density styrofoam as my base, and created the legs for the robot cake. Since I'm not used to working with this stuff, a sweet man named Lou helped along in this process. I first created a template for all the parts of the cake on the computer, and then cut them out of cardboard. Lou used the templates to cut out the parts from the high density styrofoam with the help of a hot wire. The pieces were then glued together and left to dry overnight with 40 lbs of weight sitting on top. This ensured full contact of the glued surfaces, and also acted as a weight test for me. I knew this cake was going to be heavy.
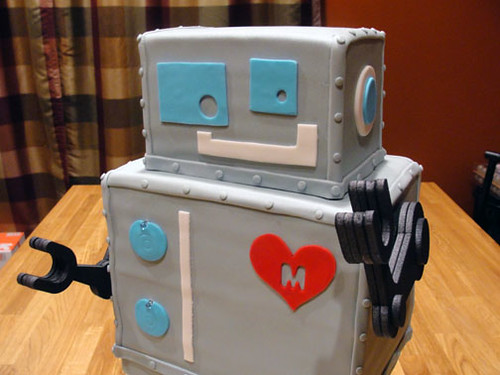 The body and head of the robot was much easier compared to the legs. I baked three half sheets of horchata cake and a batch of cinnamon buttercream. I stacked 4 layers of the cake, nestled between the spicy buttercream, and carved to even out the sides. This was then covered in a light gray fondant, smoothing down all sides with a fondant smoother. The head was 3 layers stacked and covered the same way, but was carved down slightly smaller than the body. The body was then carefully lifted onto the robot legs. A bit of duct tape secured the top of the base to the cake board beneath the body of cake. Using a template of the the head, I marked the area on top of the body where the top cake would sit. This way, I could make sure that my dowel rods would not be seen once inserted. I measured 4 dowel rods accordingly and cut down to size. These were then inserted within the area that I had marked. Piping a small dab of buttercream acted like glue, as I carefully set the head portion of the cake on top. To add a bit of detail, I rolled out strips of the gray fondant and adhered to all edges. Small balls of the same fondant were flattened to create rivets.
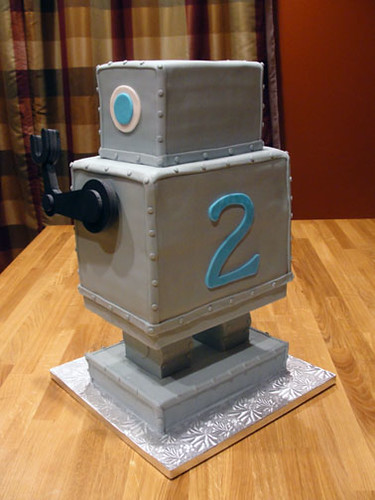 Once the body and head of the delicious robot were stacked, I had to cover up the legs to make it look like one cohesive cake. In order to adhere the fondant to the high density styrofoam, I spread a thin layer of piping gel on the base with the help of a small angled spatula. Covering the base did take some patience. I had to cut out all the sides of the legs, and carefully blend the seams with my fingertip. The same treatment with the edges and rivets tied the cake and base part together. This robot was a bit naked with just the gray fondant, and covering the whole cake in luster dust was going to take forever... therefore, I airbrushed the entire thing with a silver sheen to give it an metallic look. Based upon an illustration I found online, I decided on simple geometric shapes for the robot's facial and body features. The different sizing and angles gave this robot the perfect childish expression it needed. For a personal touch, like this wasn't custom enough, I added a whimsical heart with an "M", and a large number "2" on the back of the robot. The arms were layered shapes cut out of black foam board glued together, and attached to a dowel rod. These were then inserted into the sides of the cake with some space in between. No robot could be complete without any lights, right? I carefully cut out two small circles from the front of the cake, just big enough to fit the two flashing LED light units. These units ran on a small watch battery, so they did not require much space or running of any wires. I wrapped the lighting units in plastic wrap before inserting them to keep it food safe. I then cut out two slightly larger blue circles and covered up the openings, leaving a small hole for the light to shine through. The result was perfect! Seeing my son's reaction was the best reward for this cake, oh! and eating it too! :)
Make sure you check out the lights in action here! Hope you enjoyed this one!
Make sure you check out the lights in action here! Hope you enjoyed this one!
Subscribe to:
Posts (Atom)


Social Icons