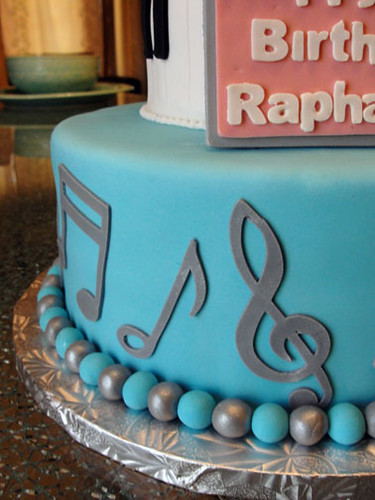
A Musical Sweet 16 for Raphaella

November 11, 2010

A few weeks ago, a long time friend of mine left me a message about a cake for her niece's Sweet 16th birthday.  She wanted to give her a pretty cake that was custom made for her and her alone.  Cecilia and I went over ideas and details, from cake flavor to the shade of blue.  Most of the cakes I make are my interpretation and designs based on themes or personality traits of the recipient.  This cake was entirely designed by Cecilia, and I had to make her vision a reality.

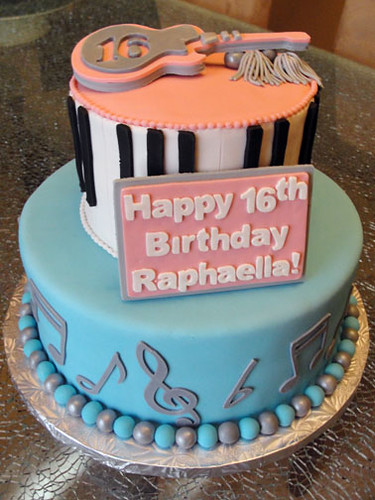
Raphaella was a pepped up cheerleader with an appreciation for music.  Hence, the theme of this sweet 16 cake came naturally.  The part that took a little pondering about was the cake itself.  This cake would be the introduction of fondant to a group of whipped icing devotees.  Did I mention that they were used to having fresh fruit in their cakes?  That is a no-no when it comes to an icing that prefers the tabletop in an air-conditioned room over a fridge.  Exposing fondant to extra moisture would created a collapsed catastrophe.  Not to mention that refrigeration would make the fondant rock hard.  Coming from a similar background, I completely understood.

This cake consisted of two stacked layers of coffee flavored cake sandwiched around velvety layers of mocha whipped icing... hint: Wilton's!  I used their mix and added cocoa and instant coffee for a rich mocha flavor.  This recipe can withstand being at room temp up to three days so don't assemble the cake too ahead of serving.  Each 4" stacked cake then received a thin blanket of buttercream and it was time to decorate!  The bottom level was a canvas of that "Tiffany" blue that all girls love, while dark silvery musical notes danced whimsically around its sides.  The top level was covered in Raphaella's fave pink and surrounded by black and white piano keys that I wanted to play "Hot Cross Buns" on... sorry, that's all the piano I could remember.  The other key elements to this cake was the pink guitar and the message plaque.  These were made a day ahead out of gumpaste and left to dry prior to assembly.   The top level was finished off with petite strings of pearls, and the bottom was circled by alternating blue and silver fondant balls.  Now that's a sweet 16!

Blue Lace Bridal Shower Cake for June!

October 26, 2010

Late last month, a charming lady by the name, Grace, contacted me about a cake for her friend's bridal shower.  You have to understand, Grace was one of my lil sis' roomies back in college.  I remembered that she once baked a cake that looked like Winnie the Pooh, and I suddenly got intimidated.  In the back of my mind, I thought that she was going to judge my every detail.  My nerves really got the best of me, and I didn't know why.  To top it off, this would be the first time that I would balance two cakes at once.  The Retro Stove cake I posted earlier was also due that very weekend!

The next morning, as I called Grace, my heart started to steady as she spoke in a calming voice and said, "I trust you and your designs".  That was all I needed to hear, and to know that I had complete artistic control over this cake.  I was full of spunk again.  After some careful planning, the cake was completed before I knew it.

The cake was designed as a two layer stacked cake, starting with my newest Lavender Vanilla cake recipe, and filled with a rich buttercream.  Each layer was then covered in snow white fondant and smoothed to perfection.  The bottom border received a simple pastel blue lace motif, while the top layer was covered with a free flowing filigree pattern in the same color.  A simple bow and a lovely letter "J" finish this lovely cake for a lovely bride-to-be.  Congrats to June!

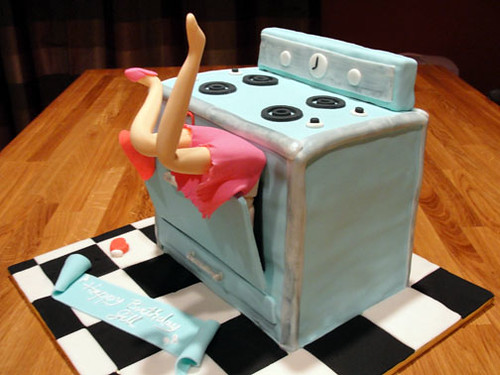
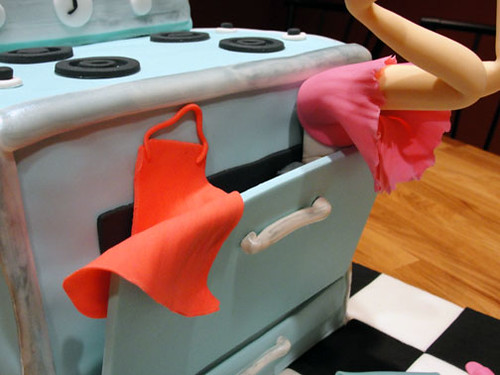
Oh No! Jill M. fell in her oven! Happy 50th!

October 17, 2010

Let me start by saying that this has got to be my craziest and funniest one yet!  When my co-worker Jen asked me to design a cake for her sister's beautiful age of 5-0, I did not hesitate to say yes.  I am glad that I took on this cake.  I asked Jen about her sister to get ideas for the design and it turns out that Jill loves to cook, and has a great sense of humor.  I first started sketching out cakes that were stacked for a more elegant approach, then I tried a 3D approach and sketched a cake that resembled a butcher block cutting board with diced veggies and an chef's best knife upon it.  Then as Jen reviewed these and saw one that had a mini stove place at the top layer, "How about just a stove?".  "How about a stove with her stuck in it?", says I.  "Love it!"

I searched through pages of images and came across the perfect pastel blue retro oven stove to put lovely Jill in.  The baking of the cake and the elements of the stove was the easy part.  It was the element of Jill's legs sticking out of the oven and the oven door slightly ajar that was baffling to me.  I had to come up with a way to keep gravity from pulling down the angled door and rip away from the cake.  Not only that, but to be able to support the weight of the torso and legs.  A cake falling part is a baker's worst nightmare!

After some careful planning, I modeled mini Jill's torso and legs out of a 50/50 mixture of fondant and gumpaste two days ahead for the proper amount of drying time.  I did the same for the oven door, but only used gumpaste tinted with a touch of blue fondant to match the color of the rest of the stove's pastel fondant.  Using a template that I cut out of cardboard, I shaped black gumpaste wedges to act as anchors to attach the door to the front of the cake.  The cake was baked a day ahead of time prior to assembly to allow for it to settle and cool.  The sheets of my spiced chocolate cake were cut in half and stacked and filled with cinnamon buttercream.  The 8" tall cake was then covered in the same and wrapped in a pastel blue blanket of fondant. The little details were cut out of fondant and gumpaste and attached on to bring the stove into reality.  Using two bamboo skewers and gum glue, the door was attached and propped in place to dry.  The torso was covered in pieces of clothing and slid into position.  The legs were modeled around bamboo skewers and I used these to attach the legs into the cake.  Rolling out a sheet of pink fondant super thin and ruffled with a veining tool, a realistic skirt was fashioned and drapped around the legs.  To exaggerate the situation of the cake, one slipper place on a foot with another on the black and white tiled floor.  An apron was draped on the oven door opposite from the legs for visual balance.  For the final touch, I brushed on silver fondant glaze for a weathered chrome look.  Don't you love it?  I do!

Buttercream... What?! That is so unlike me!

October 15, 2010

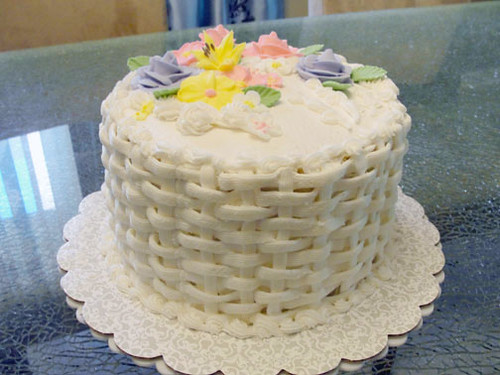
Yes.  I do love fondant, but not everyone likes fondant.  Some people just love or prefer buttercream, but I'm not a buttercream expert.  I started decorating cakes backwards.  I tried running before I could walk.  I started carving cakes before I could even bake one.  Recently, I decided to take some classes and freshen up my piping and buttercream techniques...time to put on some training wheels!!!

I took some local classes, and it was worth dragging myself out of bed every early Saturday morning :)  My fear of piping borders were subsided and my appreciation for the fluffy and sweet icing was renewed.  No more filling in spaces with a star tip for me!  You want a bouquet of roses?  I got roses!... You get what I mean, right?  Most of all, I can now ice a cake like it's super smooth plaster on a wall.  Except, it's edible and really good.  Yay for buttercream!

Latest Instagrams

© MamaWa's Cake Journey. Design by FCD.