
Summer of Love and Wedding Cakes
August 20, 2014
I can't believe that Labor Day is right around the corner, and that summer is coming to an end :( This summer was full of surprises, adventures, and lots of love in the air! I was lucky enough to not only attend two wonderful weddings, but was also asked to make their wedding cakes for their special day.
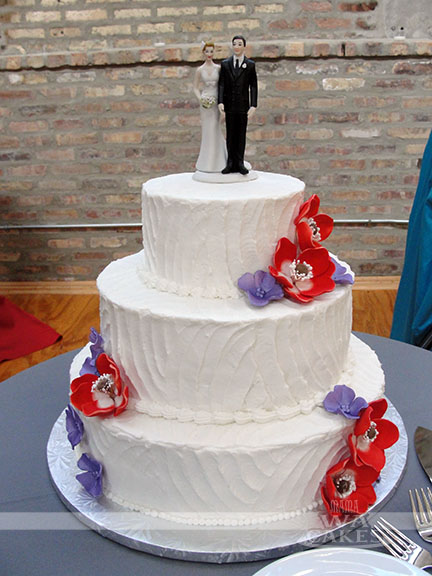
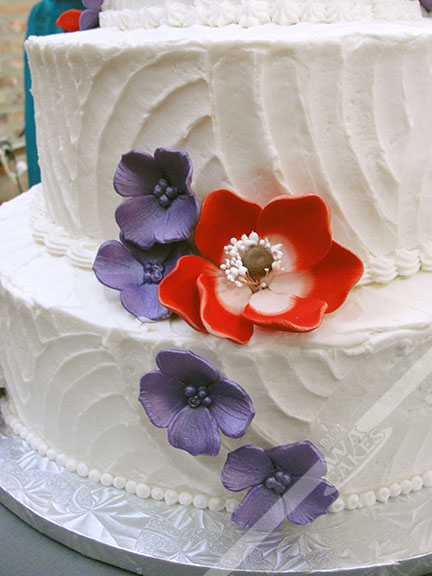
The first wedding cake was for my old friend, Laura. We met back in early 2003, and have been friends since. We used to have our weekly sushi lunches.... I'm getting hungry. She wanted something traditional, but not old fashion; modern, but not too over the top. After a few exchanges of ideas, I showed her a sketch of a buttercream cake with a modern swirled finish. The tiers would be accented with gumpaste and royal icing flowers of her wedding colors. The cakes were torted and filled with strawberry preserve, and crumb coated. I then used a Wilton icing tip and doubled iced the cakes. To achieve the finish, I used a small angled spatula and ran it across the sides in a radiating rainbow motion, and alternating the direction as I go. Make sure to overlap over the end of previous swirls. I did this for all the tiers before stacking them. Once stacked, I piped different borders on each tier. The cake was then accented with gumpaste red poppies and royal icing hydrangeas that were airbrushed with a lavender sheen for some sparkle.

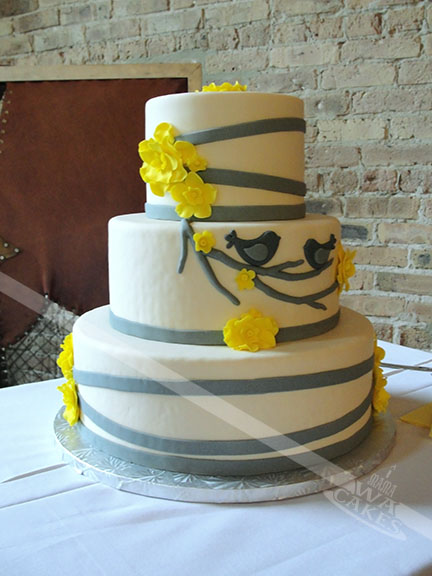
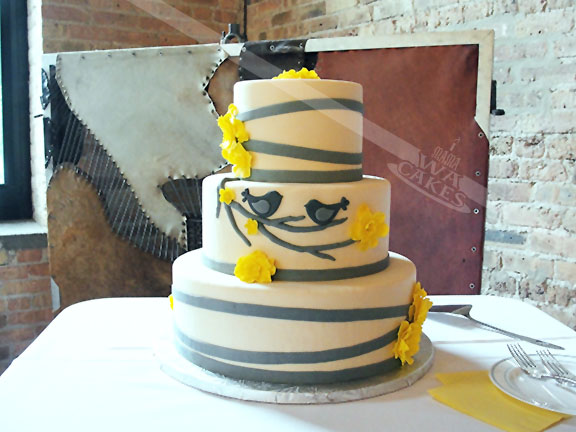 The second cake was for my co-worker and friend, Jenn. This cake was definitely different from any other I've made... only the top tier can be eaten! Jenn, as crazy as it may sound, is not a cake person... I know! Who doesn't love cake?! But, that didn't mean she was skimping on the sweets. She had an entire sweet table, candy buffet, and a popcorn corner! Needless to say, she didn't want to end up with tons of cake. However, she wanted one for show and a top tier for their 1st anniversary. The solution was to have two large dummy layers, and a top tier of scrumptious cake made with pink muscato champagne. We looked through the internet for inspiration, and we decided on a white base with ribbons of grey fondant. The pop of color came from the fantasy yellow flowers that were shaped from gumpaste. No wedding could be complete without lovebirds! The dummy cake layers were first prepped for the fondant by rounding the super sharp corners. I trimmed the corners with an blade to prevent them from tearing into the fondant. They were then misted with water, and then covered. The bottom layer was attached to the cake drum with skewers that I measured and trimmed. I just hammered it through the covered dummy cake until it hit the drum. The middle dummy cake was then attached to the bottom dummy with the same skewer method, except it didn't have reach the cake drum. The top cake tier was torted and filled with champagne buttercream. I cumb coated the cake and covered it in white fondant. The bottom and top tiers were then decorated in the same matter, with winding ribbons of grey. The middle was the canvas to a blossoming tree branch where the lovebirds perched. Due to the top heaviness of the cake (dummy cakes are really light), it is much safer to attach the top tier (which is much heavier) onsite. I simply placed it on top of the dummy layers and attached it with buttercream.

The first wedding cake was for my old friend, Laura. We met back in early 2003, and have been friends since. We used to have our weekly sushi lunches.... I'm getting hungry. She wanted something traditional, but not old fashion; modern, but not too over the top. After a few exchanges of ideas, I showed her a sketch of a buttercream cake with a modern swirled finish. The tiers would be accented with gumpaste and royal icing flowers of her wedding colors. The cakes were torted and filled with strawberry preserve, and crumb coated. I then used a Wilton icing tip and doubled iced the cakes. To achieve the finish, I used a small angled spatula and ran it across the sides in a radiating rainbow motion, and alternating the direction as I go. Make sure to overlap over the end of previous swirls. I did this for all the tiers before stacking them. Once stacked, I piped different borders on each tier. The cake was then accented with gumpaste red poppies and royal icing hydrangeas that were airbrushed with a lavender sheen for some sparkle.
Congrats again to the two couples!!!!
Soul Togetherness Cake
August 15, 2014

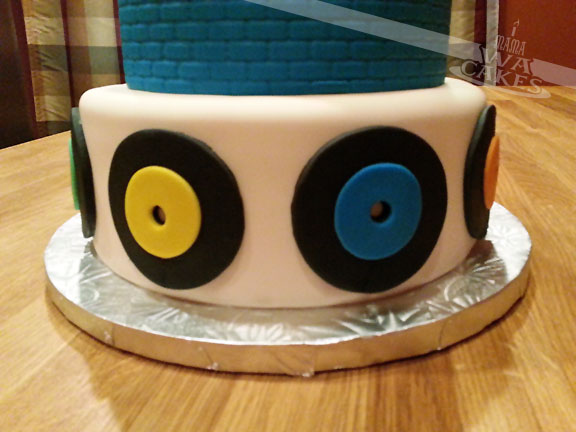
A while back, I was asked by a friend if I could make a birthday cake for her fellow 45 vinyl enthusiast, Kevin. Kevin has recently introduced Soul Togetherness to Chicago, a weekend festival that brought in an international cast of DJs, and collectors of rare obscure American soul music, all on original 45rpm vinyl. His birthday coincided with the festival, so naturally, she asked that the cake resemble their logo... no problem!
The cake started out with two 8" rounds and 2 6" rounds of spiced chocolate cake. These were torted and filled with a rich, buttery cinnamon buttercream. There is something magical about that combination of sweet and heat. The top tier was covered in fondant panels that I imprinted with a brick pattern, and covered the top with a circle of fondant with the same imprints. The bottom tier was covered in white fondant, and accented with mini 45s that I had cut out using round cookie cutters and icing tips.

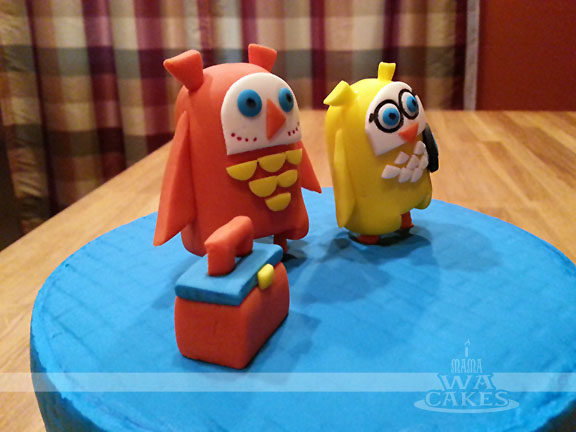
The cake was then topped off with sugar figures of the owls and record box that I had made a day ahead. The owls' bodies were shaped by making flattened logs, with one end rounded. The other end was cut with a knife to create the legs and lower half. Skewers were used for the legs, and covered in a thin sheet of fondant. I left the skewers long so I could insert the owls into the cake. The wings and ears were cut and attached with a touch of water. A tip for details like these is to poke or create an indent for the piece to sit into with a veining tool. I then carefully ( and tediously ) added the eyes and chest details. Small details such as the pupils, freckles, and glasses rim were drawn on with edible markers. Looking at the poster, I think I did pretty well! What do you think?


Riley's Pink Minnie Mouse Cake
June 23, 2014
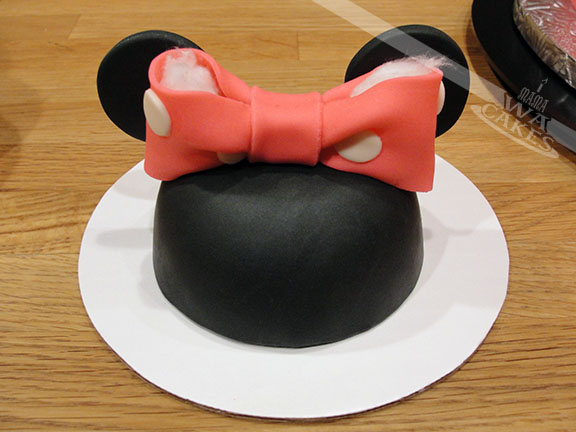
To start, I created the signature mouse hat by covering a small spice bowl with black fondant that I had added tylose to. A pinch of this powder will allow the fondant to dry like gumpaste. This is a great tool to have when working with dark colors... no need for mixing the color when there is ready made fondant! I allowed that to dry completely before carefully removing the hat part from the bowl. A great is to cover the outside of the bowl with cornstarch or powder sugar so the fondant won't stick. I then added the ears and a pretty pink bow. To give the bow a nice full shape, I stuffed a bit of tissue inside the loops and left them until they dried completely. The same method was also used to create the yellow accent bow on the cake. I rolled out a long wide strip of fondant and pinch the center, folded in the loops and pinched again to meet at the center. A narrow strip then was wrapped around the center to finish the bow. Once again, I left the tissue in the loops until it dried to give it fullness.

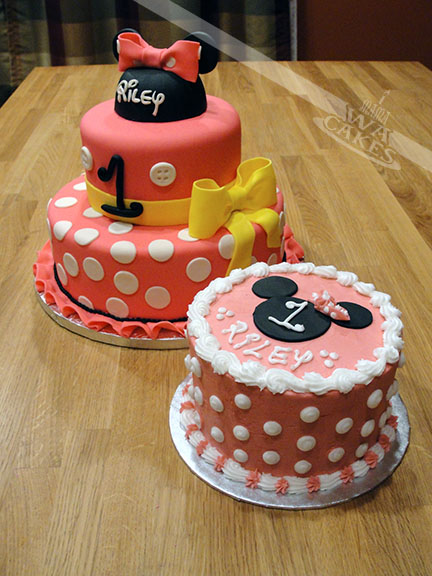
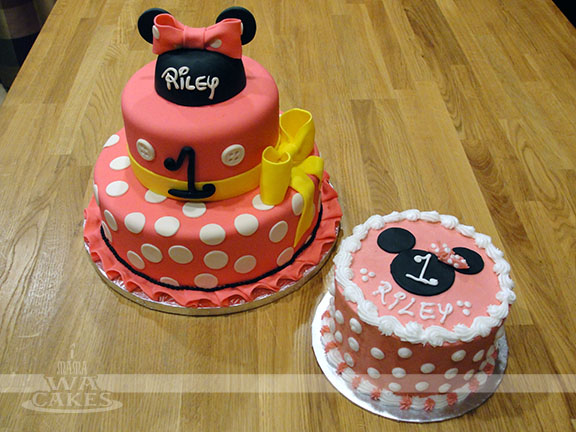
And on to the main cake! I started with a 10 inch cake that had a layer of yellow, and a layer of rich chocolate cake. The layers were torted and filled with a sweet and tangy strawberry cream cheese filling. The top 6 inch cake were two layers of chocolate nestled around a cloud of decadent coconut flakes and cream. The two cakes were crumb coated before they received a blanket of smooth pink fondant. To stack the the two cakes, I figured out the center of my cakes and measured the height of my base cake. I cut bubble straws to the proper height, and carefully inserted them half way into the cake. This is a trick I used to keep my cakes clean, and gives me time to adjust my placement if need be. I pipe a dollop of buttercream at the top of the straws, and align my top cake. I carefully release the cake, and allow it's weight to lower itself on to the base cake. This works great with buttercream cakes too! No buttercream covered fingers or gouged tops.


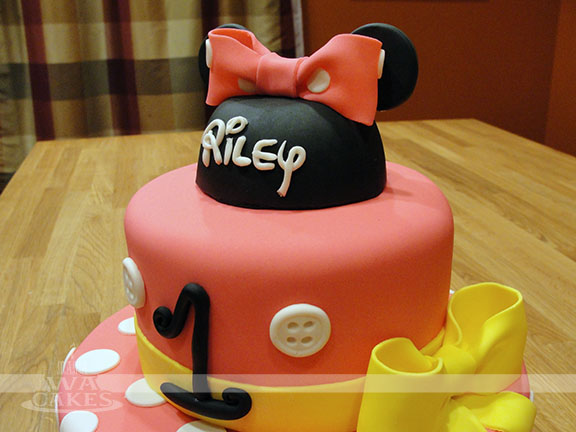 Once the cakes were stacked, I added a ribbon of yellow around the bottom of the 6 inch, and a random pattern of white polka dots were attached with a little water. The yellow bow was then attached off center, with a flow of ribbon sitting below it. The Minnie Mouse hat was then attached to the top with a bit of clear piping gel. Be careful when doing this because piping gel will dry shiny. For the finishing touches, I hand shaped Riley's name in the signature Walt Disney font and added it to the hat. I was extremely happy with how the font turned out, being a type freak and all :) I then molded two white buttons to resemble those Minnie's dress, and a whimsical number 1 for the birthday girl.
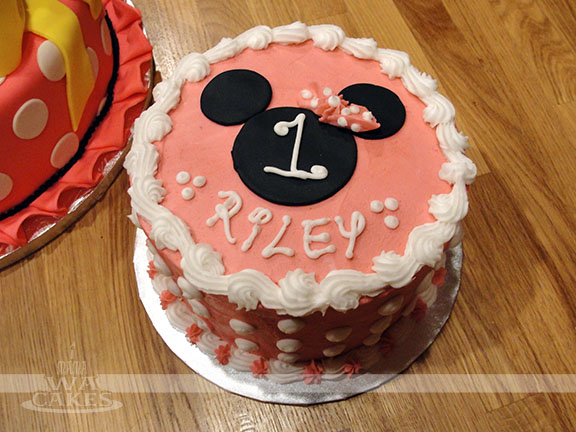
The smash cake designed with the same visual elements in mind to tie it all together. I started with a 6 inch vanilla cake filled with vanilla buttercream. The small stack of goodness was then covered in pink buttercream, and decorated with white polk dots and shell borders. I then cut out the mouse silhouette out of black fondant, and piped a pink and white polka dot bow to match the topper of the main cake. To make it complete, I piped the same whimsical number 1, and her name in white buttercream. Happy Birthday Riley!!!!


Buff Monster Birthday Cake
March 18, 2014
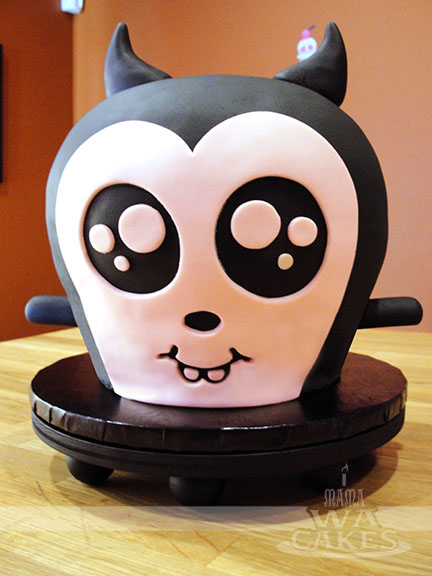
Last year, I was happily blessed with my daughter, Eva. She has been a wonderful addition to our family, and we couldn't ask for anything more. Well, except Mateo... I think he secretly wants a brother, but Eva's giving him a run for it. I can't believe a year has passed by so quickly, and it was time for her first birthday. Of course, I had to plan something fun and design a cake to match. I went online looking for some inspiration and I came across winter themes, then Valentine's Day... then I saw it! I found the cutest Valentine's Day edition Buff Monster ever!. A side note about myself, I love designer toys and vinyls... I mean LOVE. This was right up my alley, and was reminiscent of Mateo's first Dunny cake. I knew exactly what I had to do, and started planning the party.
Like all of my carved cakes, I started with a nice template to guide me on how much I needed to bake or carve away. Luckily for me, I had plenty of Ice Cream Minis on hand to reference. I stacked a 8" round on the bottom, two 9" cakes in the middle, and another 8" on top.

 Once the 4 cake layers were baked and cooled, I leveled and filled the bottom two layers. I then added support straws into the bottom half, and then placed a 7" cake board on top of the stacked cake. I then stacked the other 9" cake and 8" cake on top of the 7" cake board.
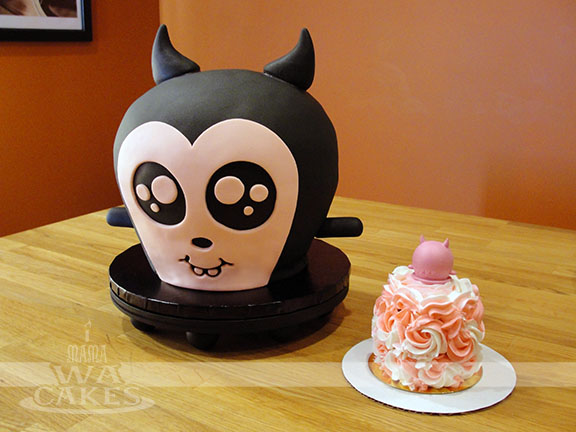
With all my layers stacked, I slowly started carving away at my cake. I used my template as my guide, sitting at eye level, and rotating the cake inch by inch. My advise for cake carving is to use a really sharp knife, carve away small sections, a chilled cake carves easier, and don't be afraid! Once I got the cake to a shape I was happy with (I carved too much away from the very bottom), a crumb coat was smoothed on before I laid on a blanket of black fondant.
 Using the template, I cut out and applied the pink fondant accents to
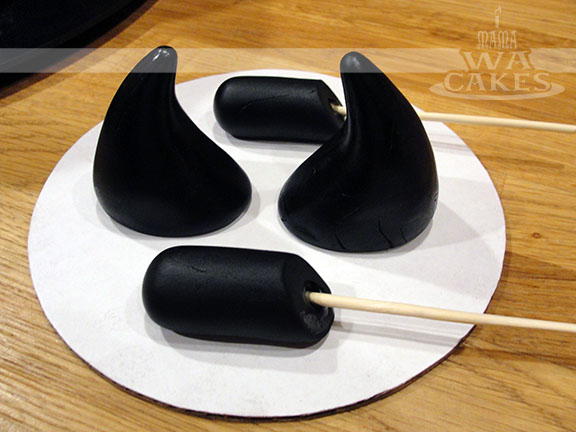
 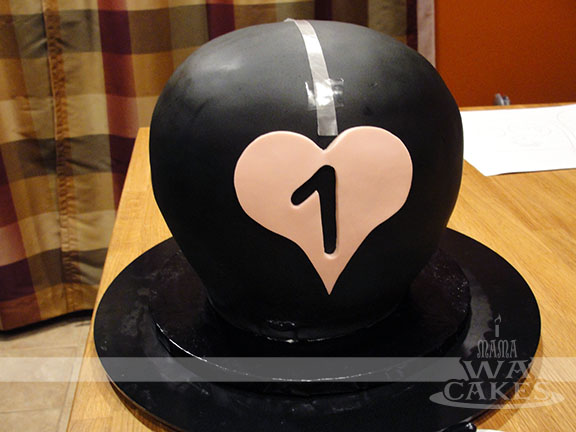 the front and back of the cake before adding the horns and arms that where shaped of out of a 50/50 fondant and gumpaste mixture. I tend to have an issue with aligning the front and back, side to side, placing decorations evenly. A trick I came up with is to use long strips of wax paper and taping it to the cake... scotch tape is food safe! This has helped me immensely to avoid lopsided arms and ears. To complete this cake, it was placed on a custom cake stand made of wood and round drawer knobs that the guys at work helped me put together :) A proper Buff Monster needs its signature round feet.
 For Eva's smash cake, I went with a 3" cake decorated in two toned buttercream rosettes. Buttercream rosettes are so easy to do, and they look wonderful for different occasions. I also figured buttercream would be easier for her to eat or dig her hands into, and in her case, put her face into. Happy Birthday to my little monster!

Subscribe to:
Posts (Atom)


Social Icons